Add the DNS records displayed to the DNS control panel of your domain's registrator. Each registrator has its own interface for that, so in case of any doubt don't hesitate to contact our friendly support to help. Take a 10-15 minute break to ensure that the new records are updated in the distributed DNS database, then click the Verify link near the domain on the Tools/Domains page. The green checkmarks will show you that your domain is properly set up. Otherwise please double-check your records (press the setup icon to view the required records). If everything is ok, just allow some time for records propagation (usually it takes no more than half an hour, but in certain rare cases, this can take as much as 48 hours). The domain is ready for sending when all the checkmarks show up.
Send the first email to your own domain using SMTP or Web API. Your new account by default has a "Free" plan which allows you to test our services by sending up to 100 emails per day to any of the domains you’ve added and verified.
We also recommend that you find out more about our Web API capabilities. It allows you to get real time event notifications, create and manage templates, unsubscribed recipients and more. You may also be interested in familiarising yourself with other articles from our knowledge base and integration libraries.
If you have any further questions, do not hesitate to contact our most helpful tech support.
Here you can find several articles describing UniOne internals in depth.
At times, you may need to send an email to several addresses at once, so that each addressee could see other recipients in To: or CC: fields. Or, alternatively, you may want to send someone a “blind copy”, or BCC. Here, we’ll show you how this can be accomplished.
Sending copies differs from regular sending in that the email parameter indicates the primary recipient, while the "To:" and "CC:" headers contain other addresses. For this, we need to specify the necessary headers "To:" and "CC:" in the headers parameter. UniOne sends these headers "as is", without changing anything about them (only MIME encoding them if necessary).
Let's consider a simple example when you need to send a letter to John at user@example.com along with a copy to Mary at cc@example.org. this case, the recipients and headers parameters of the email/send method should be as follows:
  "recipients": [
    {"email":"user@example.com"},
    {"email":"сс@example.org"}
  ],
  "headers": {
    "To": "John <user@example.com>",
    "CC": "Mary <cc@example.org>"
  }
Here's a more complex example. We send a letter to Miguel and José, with copies to Helen and Habib, plus a blind copy to bcc@example.net:
  "recipients": [
    {"email":"to_user1@example.com"},
    {"email":"to_user2@example.com"},
    {"email":"copy1@example.org"},
    {"email":"copy2@example.org"},
    {"email":"bcc@example.net"}
  ],
  "headers": {
    "To": "Miguel <to_user1@example.com>, José <to_user2@example.com>",
    "CC": "Helen <copy1@example.org>, Habib <copy2@example.org>"
  }
Please note the following:
There are several restrictions when sending copies with UniOne:
By default, when sending via SMTP, UniOne does not strictly adhere to the RFC specifications. Instead, it sends each recipient from the “To” and “CC” headers their own copy of the letter with a single email address in the final “To” header, which matches the real address of the recipient.
If you need strict compliance with the SMTP standard, i.e. emails being sent without changing the To: and CC: MIME headers (for example, to send regular and blind copies with CC and BCC), you must enable strict mode by setting the strict parameter to true in the X-UNIONE header, or contact technical support to enable strict=true for all your emails without having to pass an additional parameter in the header.
Unlike the email/send Web API call, when sending via SMTP, you are responsible for the correct MIME encoding of the headers. By default, you’ll be charged for each address in the To or CC header; in strict mode – for each recipient in the RCPT TO.
Strict mode limitations are similar to those listed for the Web API above:
In the world of email marketing, the delivery of messages via email is one of the key aspects. However, even the highest-quality mailing list can encounter delivery problems if it contains unreachable email addresses. In this article, we’ll see how email address validation can improve the effectiveness of your email campaigns and take a look at UniOne’s validation methods and proper ways to use this functionality.
Email address validation is the process of checking email addresses for correct syntax and functionality. The purpose of this process is to get rid of addresses that are either invalid or could negatively impact the sender's reputation. Through validation, you can ensure that recipients' addresses actually exist and are capable of receiving messages.
Maintaining a high level of deliverability enhances the sender's domain reputation. This, in turn, significantly reduces the likelihood of your emails ending up in spam or being blocked. Additionally, in mailing services, pricing is usually based on the number of emails sent – by sending messages to invalid addresses, you are just wasting your money.
If your subscription forms use single opt-in, i.e., subscription without confirmation, you’ll inevitably get a certain number of invalid email addresses. A user may make a typo, enter a one-time disposable address or even someone else's email. To avoid such cases, it's better to use a double opt-in procedure with confirmation. If, for some reason, this is not possible, consider integrating the email validation process into the registration form of your website. This way, you’ll be able to instantly inform users that the address they entered is invalid or unreachable.
Another common scenario is when a mailing list has not been used for mailing for a long time. Address owners may have deleted their mail or forgotten about you. Such a base needs to be checked for relevance, otherwise mailing services may block you due to a large number of returns, unsubscribes, and spam complaints.
Contact collection at offline events or through paper surveys may also lead to problems due to customer errors in addresses, illegible handwriting, or poor data collection organization. In this case, validation will also be extremely useful.
In response to the email-validation/single method call, you will receive: the status of the checked address; the reason it was set; the probability of using the address for mailings; and several other fields with useful information. You can read more about this in our documentation.
Since the email-validation/single method is intended for single checks, it has certain limitations. A maximum of two simultaneous requests are allowed, and if exceeded, an error will be returned. The check must be quick, so we limit the checking time: if a recipient’s mail server does not respond in 5 seconds, the validation result may be undefined.
Email address validation is an important way to improve deliverability and enhance the sender's reputation. By using UniOne’s validation, you can ensure the high efficiency of your email campaigns.
Projects offer you a way to completely isolate data for different independent domains, unreachable address lists, templates, mailing settings etc.
Let’s consider a few possible scenarios for projects:
While keeping your projects entirely isolated, you may still manage them and make payments using your primary UniOne account. This would allow you to use the most cost effective tariff, based on the combined volume of emails across all of your projects.
Each project has its own API key, and API calls with a particular key will affect only data related to that project. This way you may be sure that the projects are entirely independent: for instance, if an addressee unsubscribes from any of your projects, it will not affect their subscription to the other ones.
You may manage your projects and create new ones either via Settings/Projects page in your account or by using project-related API calls. By default, access to this page and methods is disabled for security reasons. To enable projects functionality, please contact our support team.
While setting up your projects, keep in mind the following:
Suppression lists, or lists of unreachable addresses, serve as a means of maintaining your sender reputation and nurturing your subscribers. By using them, you suppress messages to certain addresses which, if sent, would be likely to do you harm. Our service will automatically filter out the email addresses found in these lists.
An email address may be suppressed for a variety of reasons. It may be syntactically invalid; the mailbox owner may unsubscribe from your mailings or issue a complaint; or the receiving server may be known to block certain types of emails it deems unwanted.
Generally, there are three entities that may be the source of information used to render an address as suppressed:
The particular source is returned as a value of the source field when calling the suppression/get API method. This method also provides the related cause – user complaint, unsubscription, delivery issues, etc.
There are two types of suppression lists in UniOne:
The global suppression list is a major benefit as it suppresses any mailings to addresses that are already known to be unreachable and thus helps you maintain a good deliverability score and solid sender reputation.
Let’s consider the following three scenarios.
Mass marketing emails are more likely to be considered as spam by mailbox providers, thus the primary goal is to avoid sending emails to unreachable addresses and keep the number of complaints to a minimum. It makes perfect sense to use our prior knowledge about the addresses that cannot be reached or whose owners tend to place complaints. As such, both local and global suppression lists are used for this type of email, which helps you achieve a good sender reputation and keep the number of complaints to a minimum, which in turn will improve your deliverability rate.
The default parameters for the email/send API method are optimized for this type of email.
Abandoned cart emails, balance notifications, billing reminders and the like are anticipated by the recipient, so complaints are far less likely. In this case, it would be reasonable to turn off the global suppression list and use only the local one.
To use this scenario, set the bypass_global parameter value to 1 when calling the email/send
This category includes emails that need to be delivered even at the risk of degrading your sender reputation, e. g. account confirmations, password resets or security notifications. It would make sense to skip checks for both the global and local suppression lists. However, it is advised to consider possible cases where the local list needs to be used partially, for example, to suppress letters to known complainers.
In order to send high priority letters to addresses known to be unreachable, specify bypass_global=1 and bypass_unavailable=1. If you also need to contact unsubscribed addresses, add bypass_unsubscribed=1. Similarly, with bypass_complained=1 emails will be sent to complainers as well.
To view, add or remove addresses from suppression lists, our Web API offers a set of suppression methods. For individual addresses, you may also use the Tools/Email search page in your account.<
You may remove addresses from your local suppression list whenever you like, however removal from global lists is limited to a few addresses per day and may not be available for certain addresses.
If you implement your own unsubscribing mechanism, we strongly recommend adding unsubscribed addresses to the UniOne suppression list as well, using suppression/set API method – this will help us to ensure that no emails are sent to anyone who has canceled their subscription. This is especially useful if your messages originate from several sources, and lists of unsubscribed addresses for different types of mailings are maintained separately.
While viewing statistics, setting up webhooks, and processing delivery results you will encounter various email delivery statuses. This article provides a detailed specification of such statuses and how they should be processed.
At the most basic level, there are eight standard email statuses. These statuses are returned via webhooks or downloaded using the event-dump/* methods. The status field can have one of the following values:
If you set the value of delivery_info to 1 while creating a webhook, an extended delivery status will be added to the event data. The extended status is also available in the CSV data obtained with event-dump/* methods. We use these extended statuses to provide detailed delivery information in the statistical reports
Extended statuses are determined by analyzing the SMTP server responses. Oftentimes the error code or even the full error message is not sufficient here, because different servers and mailbox providers tend to use them somewhat inconsistently. Also, as mailbox providers evolve, existing messages may take on different meanings and new ones may be added. Therefore we do not provide an exhaustive list of extended statuses, and we cannot guarantee that the list will not be changed in the future; however, the semantics of existing statuses will remain unchanged.
Extended statuses are not available for all events. If the value is missing, you are best advised to be guided by the standard statuses described above.
Below is a list of extended statuses, grouped by alleged system action.
|
Success |
|
|
ok_sent |
The message has been sent (an intermediate status before delivery or non-delivery). |
|
ok_delivered |
The message has been delivered. |
|
ok_read |
The message has been delivered and opened by the recipient. |
|
ok_link_visited |
The message has been delivered and opened; the recipient has clicked on one of the link. |
|
Complaint or unsubscription – the address is added to the list of complainers or unsubscribed addresses. The subsequent mailings to this address will be blocked, unless the address is removed from the blocking list using suppression/delete. |
|
|
ok_spam_folder |
The message has been delivered and placed into the Spam folder by the receiving server. |
|
ok_fbl |
The message has been delivered and manually tagged as Spam by the recipient. |
|
ok_unsubscribed |
The message has been delivered, and the addressee canceled the subscription using the unsubscribe link. |
|
Temporary failure – a “soft bounce”, additional delivery attempts will be made. |
|
|
err_will_retry |
One or more delivery attempts were unsuccessful, the system will retry. The status is not final. |
|
Non-existent – the receiving SMTP server says the address does not exist. UniOne blocks any attempts to send email to such addresses for a long period of time (6 months for most mailbox providers). After that the address will be reactivated, because the mailbox may eventually be restored or registered anew. |
|
|
err_user_unknown |
Address does not exist (and could never have existed). |
|
err_user_inactive |
A previously active address is no longer used, delivery has failed. |
|
err_mailbox_discarded |
The mailbox has been deleted. |
|
Rejected as spam – the receiving SMTP server has clearly stated that the message will be rejected as spam. This does not always imply that the next message from the same sender will be also declined. |
|
|
err_spam_rejected |
The message has been rejected as spam. |
|
err_spam_skipped |
The message was not sent because other messages from the same task were previously rejected by the recipient’s server as spam. |
|
err_spam_removed |
The message was not sent because other messages from the same task were previously rejected by the recipient’s server as spam (same as previous, but at later stages of mailing). |
|
Long-term unreachable – numerous failed attempts in the past have led to the address being tagged as unreachable for a long period of time (6 months for most mailbox providers). Emails to such addresses are blocked by the system. |
|
|
err_unreachable |
Address tagged as unreachable due to multiple delivery errors. |
|
skip_dup_unreachable |
Sending canceled because the address has been previously tagged as unreachable. |
|
Short-term unreachable – delivery attempts failed, but the address will be tagged as unreachable for a few days only, or will be immediately available for further mailing. |
|
|
err_mailbox_full |
Mailbox is full. |
|
skip_dup_mailbox_full |
Sending canceled because recent attempts resulted in “mailbox full” response. |
|
err_too_large |
The receiving server says the message is too large. |
|
err_unsubscribed |
The addressee has unsubscribed from your messages. |
|
err_blacklisted |
The message has been rejected because the sender domain or IP was found on a blacklist. |
|
err_skip_letter |
Sending canceled because the target address is temporarily unreachable. |
|
err_domain_inactive |
The target domain does not exist or does not accept mail. |
|
err_destination_misconfigured |
The target domain does not accept mail due to a solvable issue (e.g. SMTP service temporarily down). |
|
skip_dup_temp_unreachable |
Sending canceled because the target address is temporarily unreachable. |
|
err_lost |
The email has not been sent due to the inconsistency of its structure, or has been lost as a result of an internal error. The user should re-send the letter. |
|
err_internal |
An internal error has occurred. The user should re-send the letter. |
|
err_delivery_failed |
Delivery failed due to unspecified reasons. |
In certain cases, UniOne does not allow a particular email to be sent (for example, an addressee has unsubscribed from your messages). The email/send call will return the reason for blocking. The reason may also be obtained using the API methods for suppressed addresses, suppression/get and suppression/list.
A reason for blocking is not the same thing as a delivery status, but as they are logically interconnected, we find it convenient to give a description here.
The reasons for blocking may be as follows:
|
unsubscribed |
The addressee has unsubscribed by following the link in the email body or List-Unsubscribe header, or was added to the list with suppression/set API call. |
|
temporary_unavailable |
One or more previous attempts for this address were unsuccessful, and the address has been tagged as “temporarily unavailable”. In a few days, the status will be removed and the address will be made available for further mailings. The reasons for this (e.g. mailbox is full or a spam block is in effect) are described above in the extended statuses table. |
|
permanent_unavailable |
Address is permanently unavailable, as verified by multiple sending attempts. Strictly speaking, the status is not quite “permanent”, usually it is in effect for about half a year. |
|
complained |
The addressee has tagged one of the previous letters as spam, issued a complaint in some other form or added to the list using suppression/set API call. |
|
blocked |
The address is blocked by the system. There is a small number of such addresses; most of them are either spam traps or addresses like support@gmail.com which definitely does not belong to a person. |
|
invalid |
The target address is invalid (for example, the @ sign is missing). |
|
duplicate |
The address has been included in the same email/send call more than once. |
To register subscribers’ clicks, all links in your emails are replaced with links to a dedicated link tracking domain. When a link is clicked, the click is registered, and then the reader is redirected to an original target page. UniOne allows you to use your own domains for link tracking, which increases the credibility of your messages as unfamiliar domain names do not show up in the email.
To add a new domain, go to the Settings – Tracking domains page and click the plus icon alongside the page title.
![]()
The domain name you enter will be used for link tracking. We recommend using a third level domain, preferably a subdomain of your brand’s primary domain. For instance, for example.com you may use names like send.example.com or link.example.com. If you use projects, you’ll also be able to specify projects for this domain. When ready, click “Save”.
The domain’s status will be “Awaiting DNS setup”, and you’ll need to add a few DNS records for your domain (this is done in your domain’s registrar control panel). To view and copy the required records, click the gear icon.

After the records are added, you’ll need to wait until they propagate and are updated in our system. The time it takes varies from a few minutes to a couple of hours, depending on your provider’s settings. If everything’s ok, the domain status will change to “Setup in progress”.
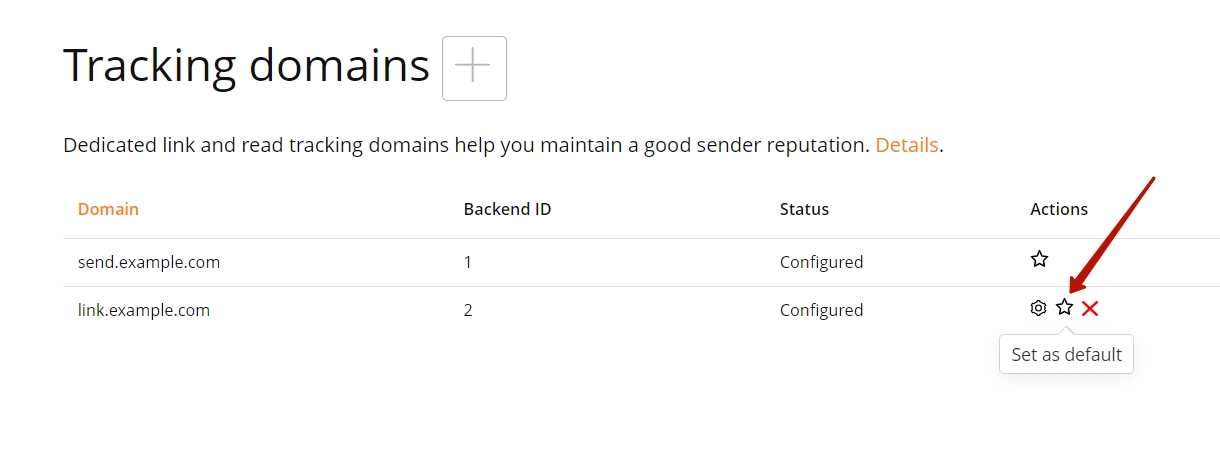
In the following 48 hours, our specialists will perform the required system setup, and the status will change to “Ready”. The domain may now be activated and, if necessary, set as default by clicking the star icon. If you’ve set up multiple tracking domains, specify the “custom_backend_id” value in email/send API call to use a particular one.
If the status changes to “Error”, contact our support team to find out what’s wrong and be advised on possible fixes.
To delete a domain you no longer need, click the cross-out icon on the right. If the domain was previously set as default, a system domain will be used instead.
General information
Dedicated IP addresses allow you to build your own reputation scores for your campaigns, totally independent from other clients who use our common pool of IPs. This strategy offers substantial deliverability benefits; on the other hand, it also requires some time to implement, since your new IPs must be “warmed up” before full-scale usage, in order to minimize the risks of blocking or ending up in spam. Mailbox providers are suspicious about large volumes of emails coming from new IPs or domains, so the number of messages sent from a new address should be increased gradually. This procedure is called “IP warmup”.
Initial setup
First of all, you will need to calculate the number of IPs you’ll need, based on your current infrastructure and sending volumes. Prepare a list of sending domains which you want to use with dedicated IPs. If you need to use separate IP addresses for different domains, please make sure that you’ve created special projects for each of these domains.
The required number of IPs for each domain or project is defined by the number of messages you’re intending to send. Currently we guarantee no less than 70 000 messages per hour from each fully warmed-up IP (the amount may actually vary from 70K to 100K, depending on the overall load and distribution of target domains). You can use this general formula for a quick estimate of the number of IPs you’ll need:
number_of_IPs = emails_per_day / 85000, rounded upwards
So, to send out, say, 10 million emails per month, or 333 000 messages per day you’ll need four dedicated IPs (333 000 / 85 000 = 3.9).
* Based on the contents of your campaigns, our specialists may advise you to order one or more extra IPs, in order to mitigate any delivery issues. Our anti-spam service is constantly keeping track of deliverability issues for all our users’ campaigns and will provide additional data on the number of IPs needed with regard to most recent anti-spam trends and any particulars of your individual case.
Open the Settings – Dedicated IPs page in your account and click the plus icon.
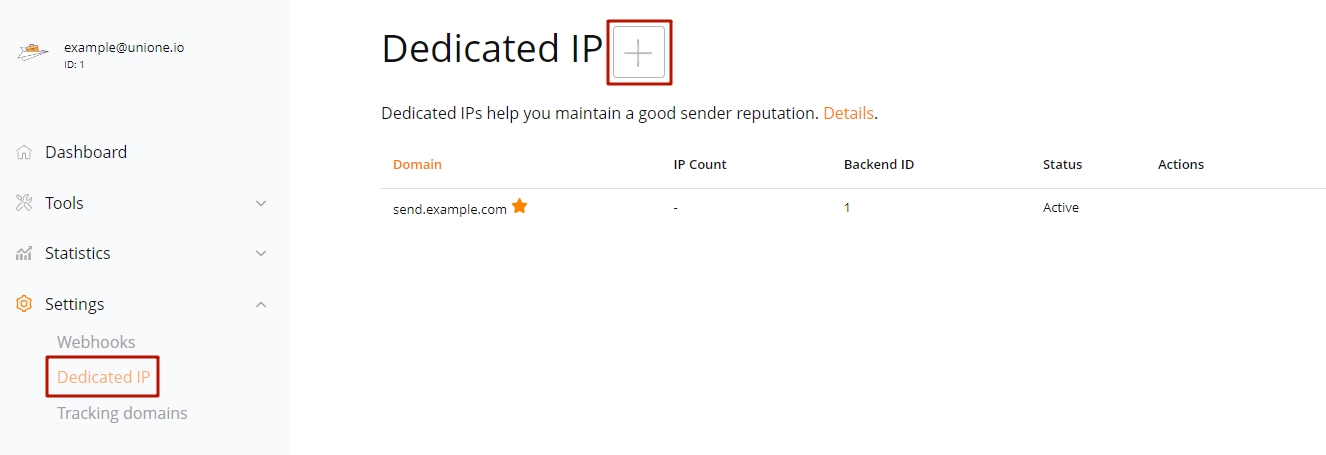
Enter a third level domain name which will serve as an IP pool name and tracking domain (for example.com, it may be something like send.example.org). Specify the number of IPs you need and click Save.
After saving, our account will be charged for the amount of $20 for each dedicated IP (a one-time setup fee) plus IP rent according to the formula: $40 divided by 30 and multiplied by the number of days left in the current accounting period. Afterwards, the monthly service fee for your dedicated IPs will be charged together with your regular payment.
(For custom contracts, the payment is carried out according to the contract’s terms.)
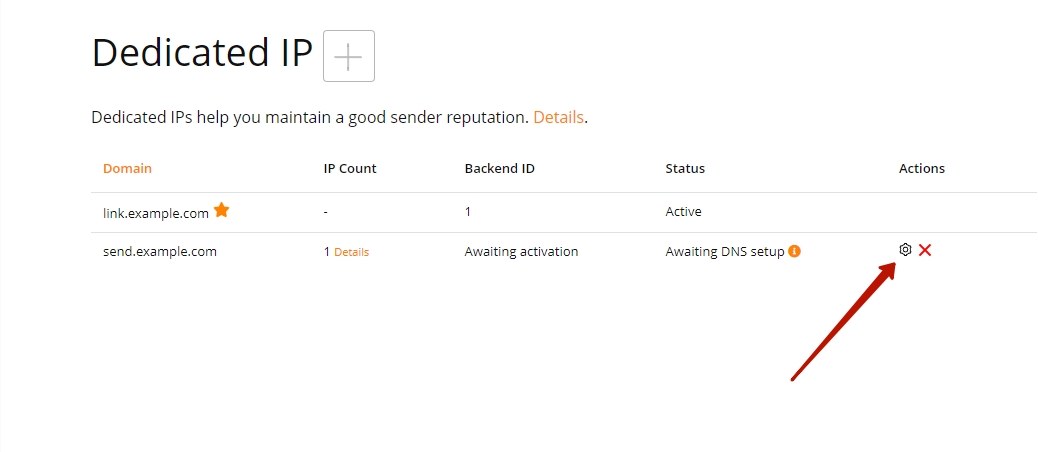
On the Settings – Dedicated IPs page, click the gear icon alongside your domain name. You’ll see a few DNS records that you will need to add in your domain registrar’s management console. Initially the domain status will be “Awaiting DNS setup”.
As soon as the new records are updated in our system (it usually takes up to two hours, depending on your provider’s settings), the domain status will change to “Domain setup in progress”.
During the next 48 hours our specialists will perform the necessary setup, and the status will change to “Active”. Now your domain is ready for use, you may activate it and designate it as a default domain. If you’ve set up more than one domain and need to specify the one to be used while sending a particular letter, specify the corresponding custom_backend_id value while calling email/send. The values can be found on the same page, in the Backend ID column.
Consistency, gradualness and regularity are vital for a proper warmup, so the mailings need to be done in smaller chunks. As a result, large campaigns may be partially delayed. Generally, there are two ways to deal with such tasks:
During the IP warmup period, it is highly recommended that you send the required number of emails each day.
IP warmup is carried out automatically following a proven procedure. Our anti-spam team members will monitor delivery rates for every IP and advise you on quota adjustments to get the best results.
Warmup limits table
The approximate hourly limits for Gmail and Yahoo Mail are shown in the table below for reference. The exact quotas, aimed at minimizing the possibility of spam blocks, vary depending on mailbox provider, the day of the warm up sequence and many other factors.
| Day of warmup | Google, emails per hour | Yahoo, emails per hour |
| 1 | 48 | 48 |
| 2 | 57 | 57 |
| 8 | 225 | 225 |
| 15 | 1100 | 1000 |
| 23 | 12000 | 2500 |
| 28 | 47000 | 5000 |
| 35 | unlimited | 10000 |
| 40 | unlimited | unlimited |
To learn what your current exact quotas are, feel free to contact our tech support anytime. As soon as the warmup procedure is over (typically in 40 days), all limits are removed, and your IPs will be used for all of your mailings.
We wish you all the best using UniOne, and may all your emails reach the designated inboxes!
UniOne offers great collaboration features for your email marketing. You can let your designer manage templates, provide marketers with statistics, and give network admins access to domain settings.
Several types of access are already defined: administrator, developer, tech support, marketer, accountant, designer, client and customized. Let’s take a closer look at each of them.
Maximum access rights. This role has control over every available setting, except the primary email address and password.
Similar to Administrator, but some settings are read-only, such as account details, payment settings and tariff.
This role grants access to all pages under Tools and Statistics menus. This means a user will be able to work with templates, assess deliverability rates, download event data in CSV (including email addresses), examine delivery problems and manage address statuses.
The Support role has the exact same rights as the Marketer described above, and can also access Settings in read-only mode (the API key will not be displayed).
This role has full access to tariff, balance, and payment history information, and can also change the tariff plan. The Accountant can view statistical data, but CSV download is not available.
The only option available for Designer is to view and edit templates in your account.
This role grants access to Statistics only, including the ability to download data.
If for some reason none of the roles described above fits your particular needs, you may set custom access permissions by checking the options you want to grant.
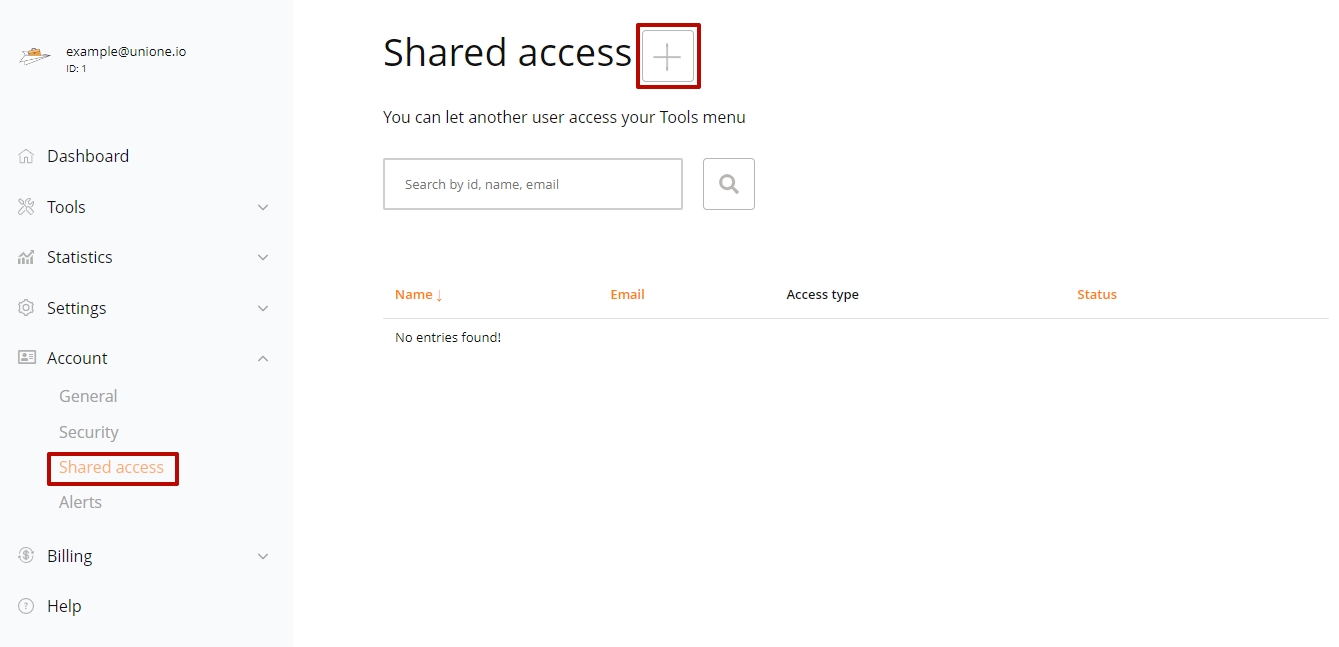
Click the menu button, navigate to Settings – Shares Access and invite a new collaborator by clicking the plus sign.
In the dialog box you should specify the new workgroup member’s email address, and set the allowed rights. If the Readonly box is checked, they will be able to view the data without making any modifications.
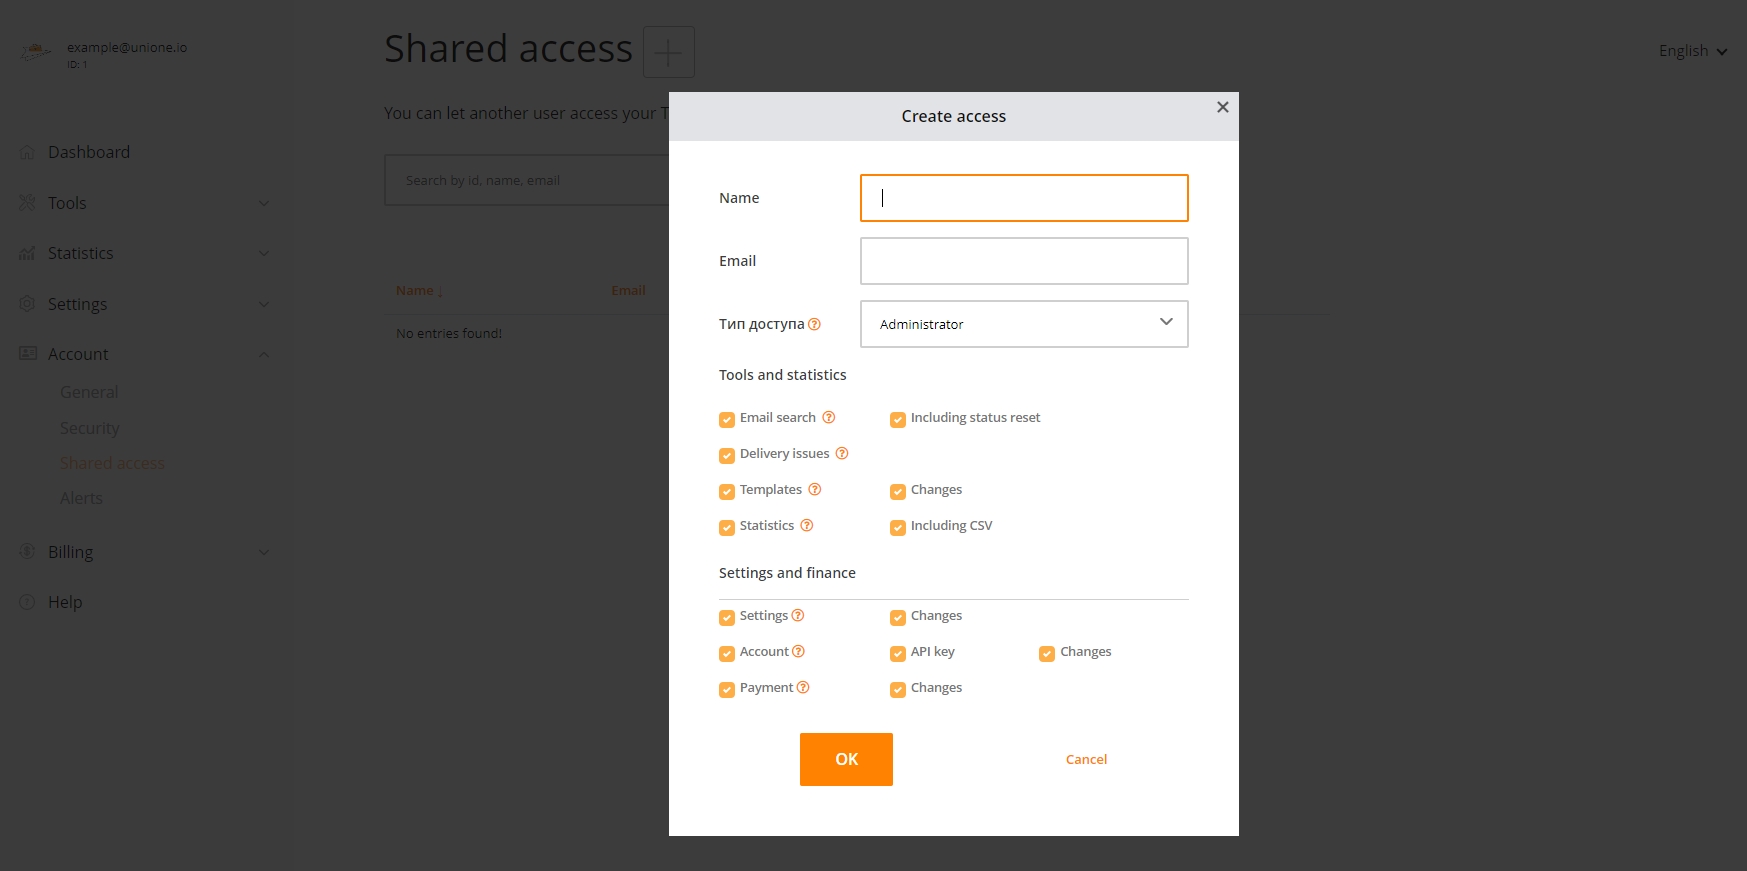
After clicking OK, the person will receive a confirmation email. If your addressee does not have a UniOne account yet, they will be prompted to create one.
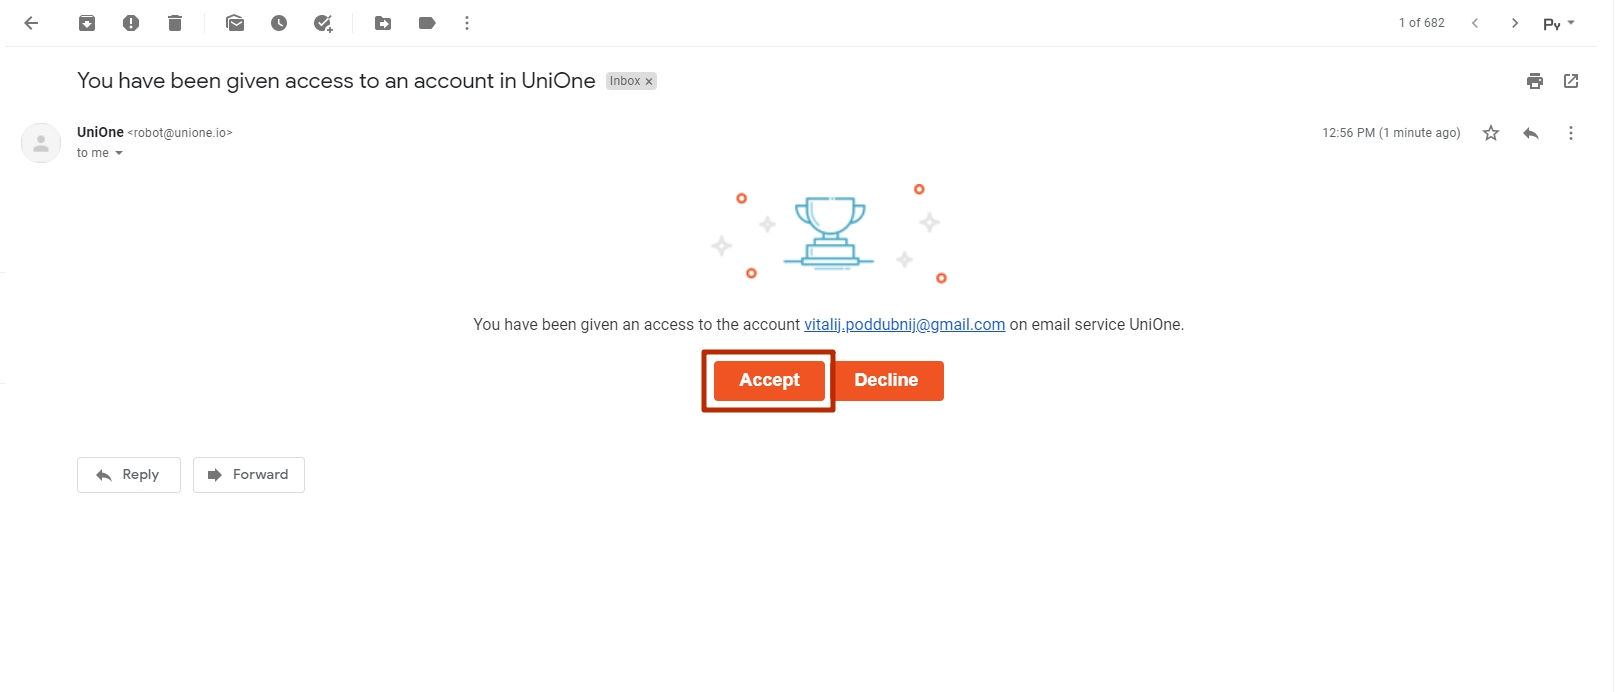
By clicking the confirmation link (and completing the sign-in process, if necessary) the person will receive the capacity to switch to your account by clicking the corresponding option in the top left corner.

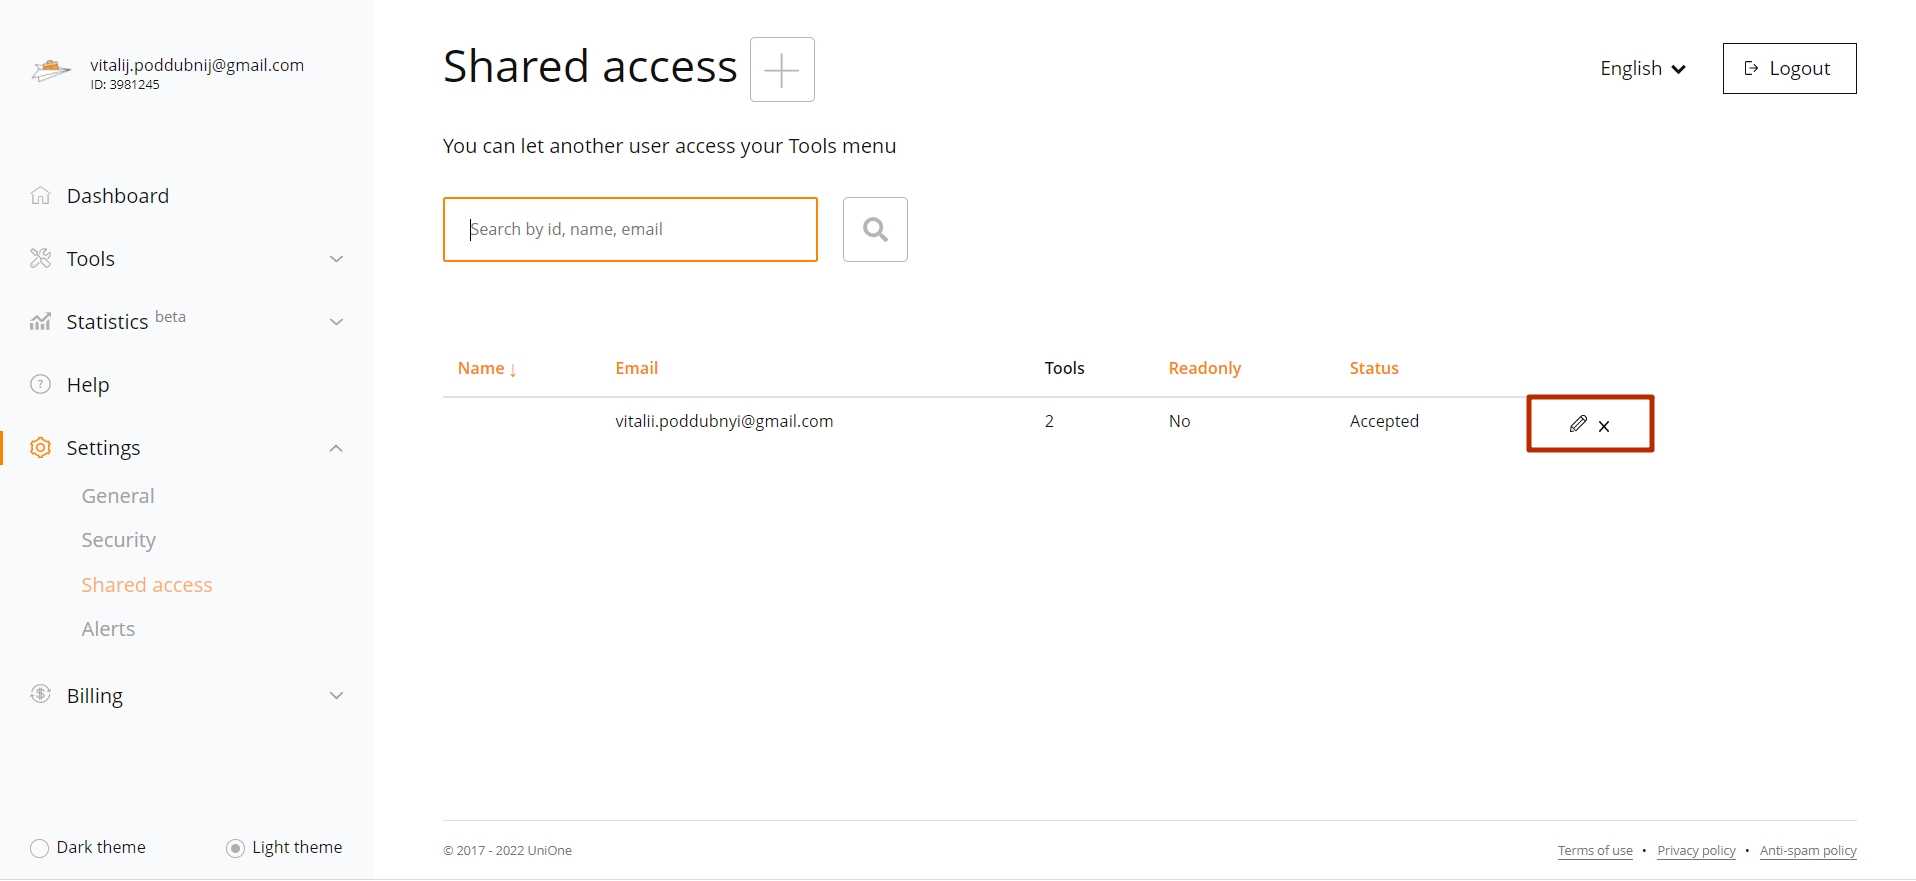
Your colleagues will see only those menu items you’ve granted them access to.
To add, modify or revoke previously given rights, you click on the pencil icon for the corresponding share. By clicking the cross icon, you permanently delete the person from the list. If you want to restrict their rights only temporarily, simply uncheck all boxes – this way you won’t need to create the entry anew.
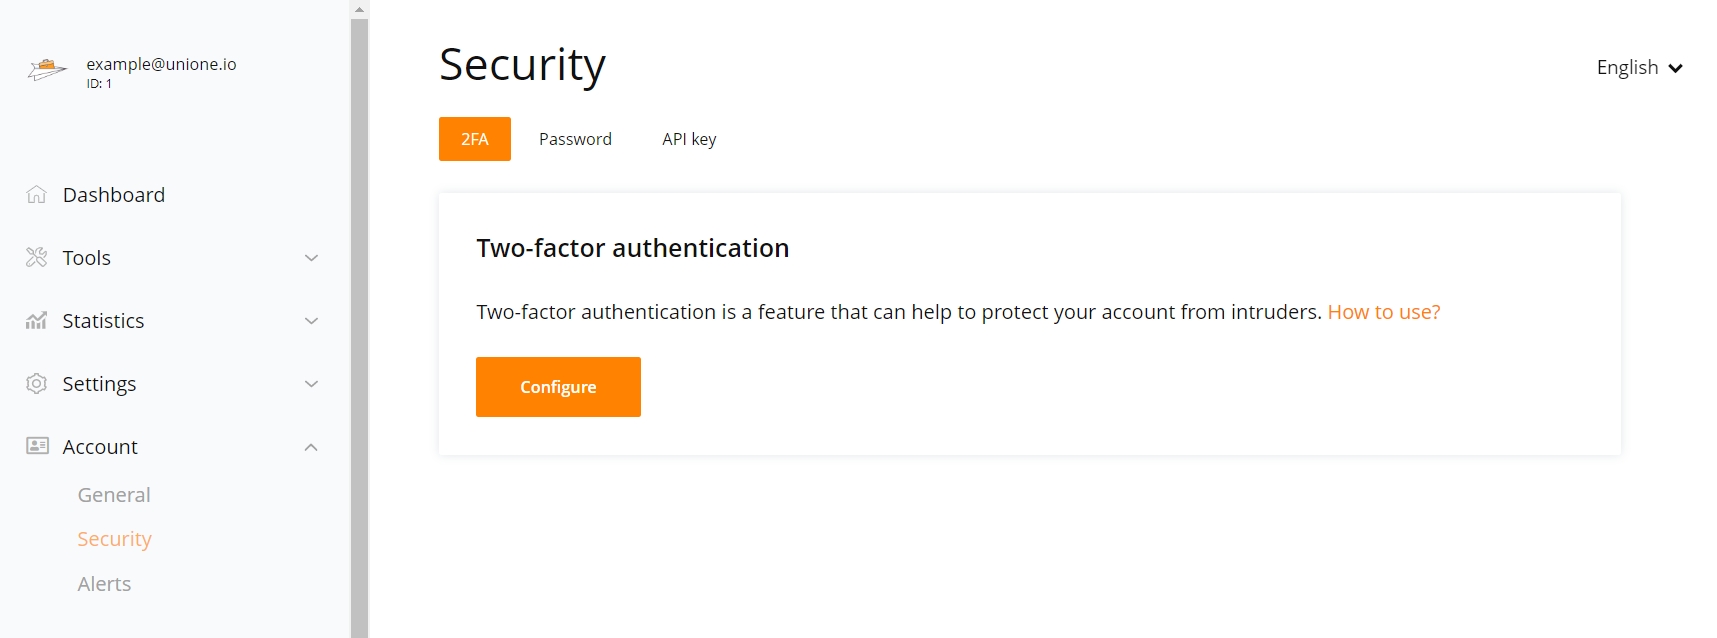
The two-factor authentication function will help to protect your account from intruders.
After logging in using email and password, the system will prompt you to enter a code from the Google Authenticator application installed on your mobile device (the code changes every 30 seconds). This way a hacker won't be able to log in just by stealing your password.
Install the Google Authenticator app (iOS / Android) on your mobile device. In the application, click the "Add account" button (choose one of two options: scan a QR code or enter the digital code)
If you have chosen "Scan QR-code" - point the camera at the code in the UniOne 2FA settings page.
If you selected "Enter code" - enter the name of your account (e.g., "UniOne") and enter the code that is specified on the two-factor authentication settings page in the UniOne account.
You have successfully added your UniOne account to the Google Authenticator app!

Two-factor authentication has been successfully enabled.
Make sure your mobile device time is set automatically. If the time of your device is set manually, the new access codes generated every 30 seconds may be out of sync and lead to an error when entering.
Enter your email and password on the log in page.
Enter the six-digit code from the Google Authenticator app on your mobile device and click on the "Sign in" button.
Enter your email and click on the "Recover password" button.
Open the Google Authenticator app on your mobile device to view the code.
Enter the six-digit code from the Google Authenticator application on your mobile device and click on the "Recover password" button once more.
Go to the two-factor authentication management page.
Enter the six-digit code from the Google Authenticator app on your mobile device and click on the "Disable" button.
After doing this you will see a page without the enabled function and with the "Configure" button.
Important! If you do not have access to your mobile device with the Google Authenticator app installed, please contact support.
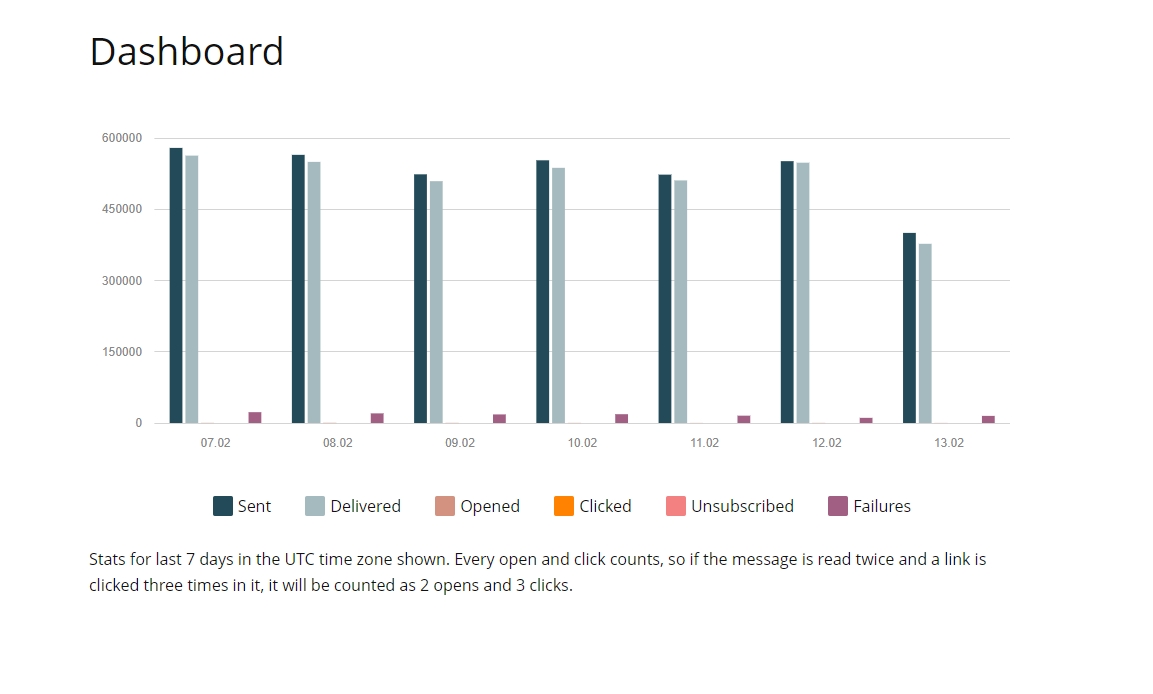
In this report, you can see data for messages that could not be delivered to the recipients, or about which there were complaints - for the last 32 days, today included:
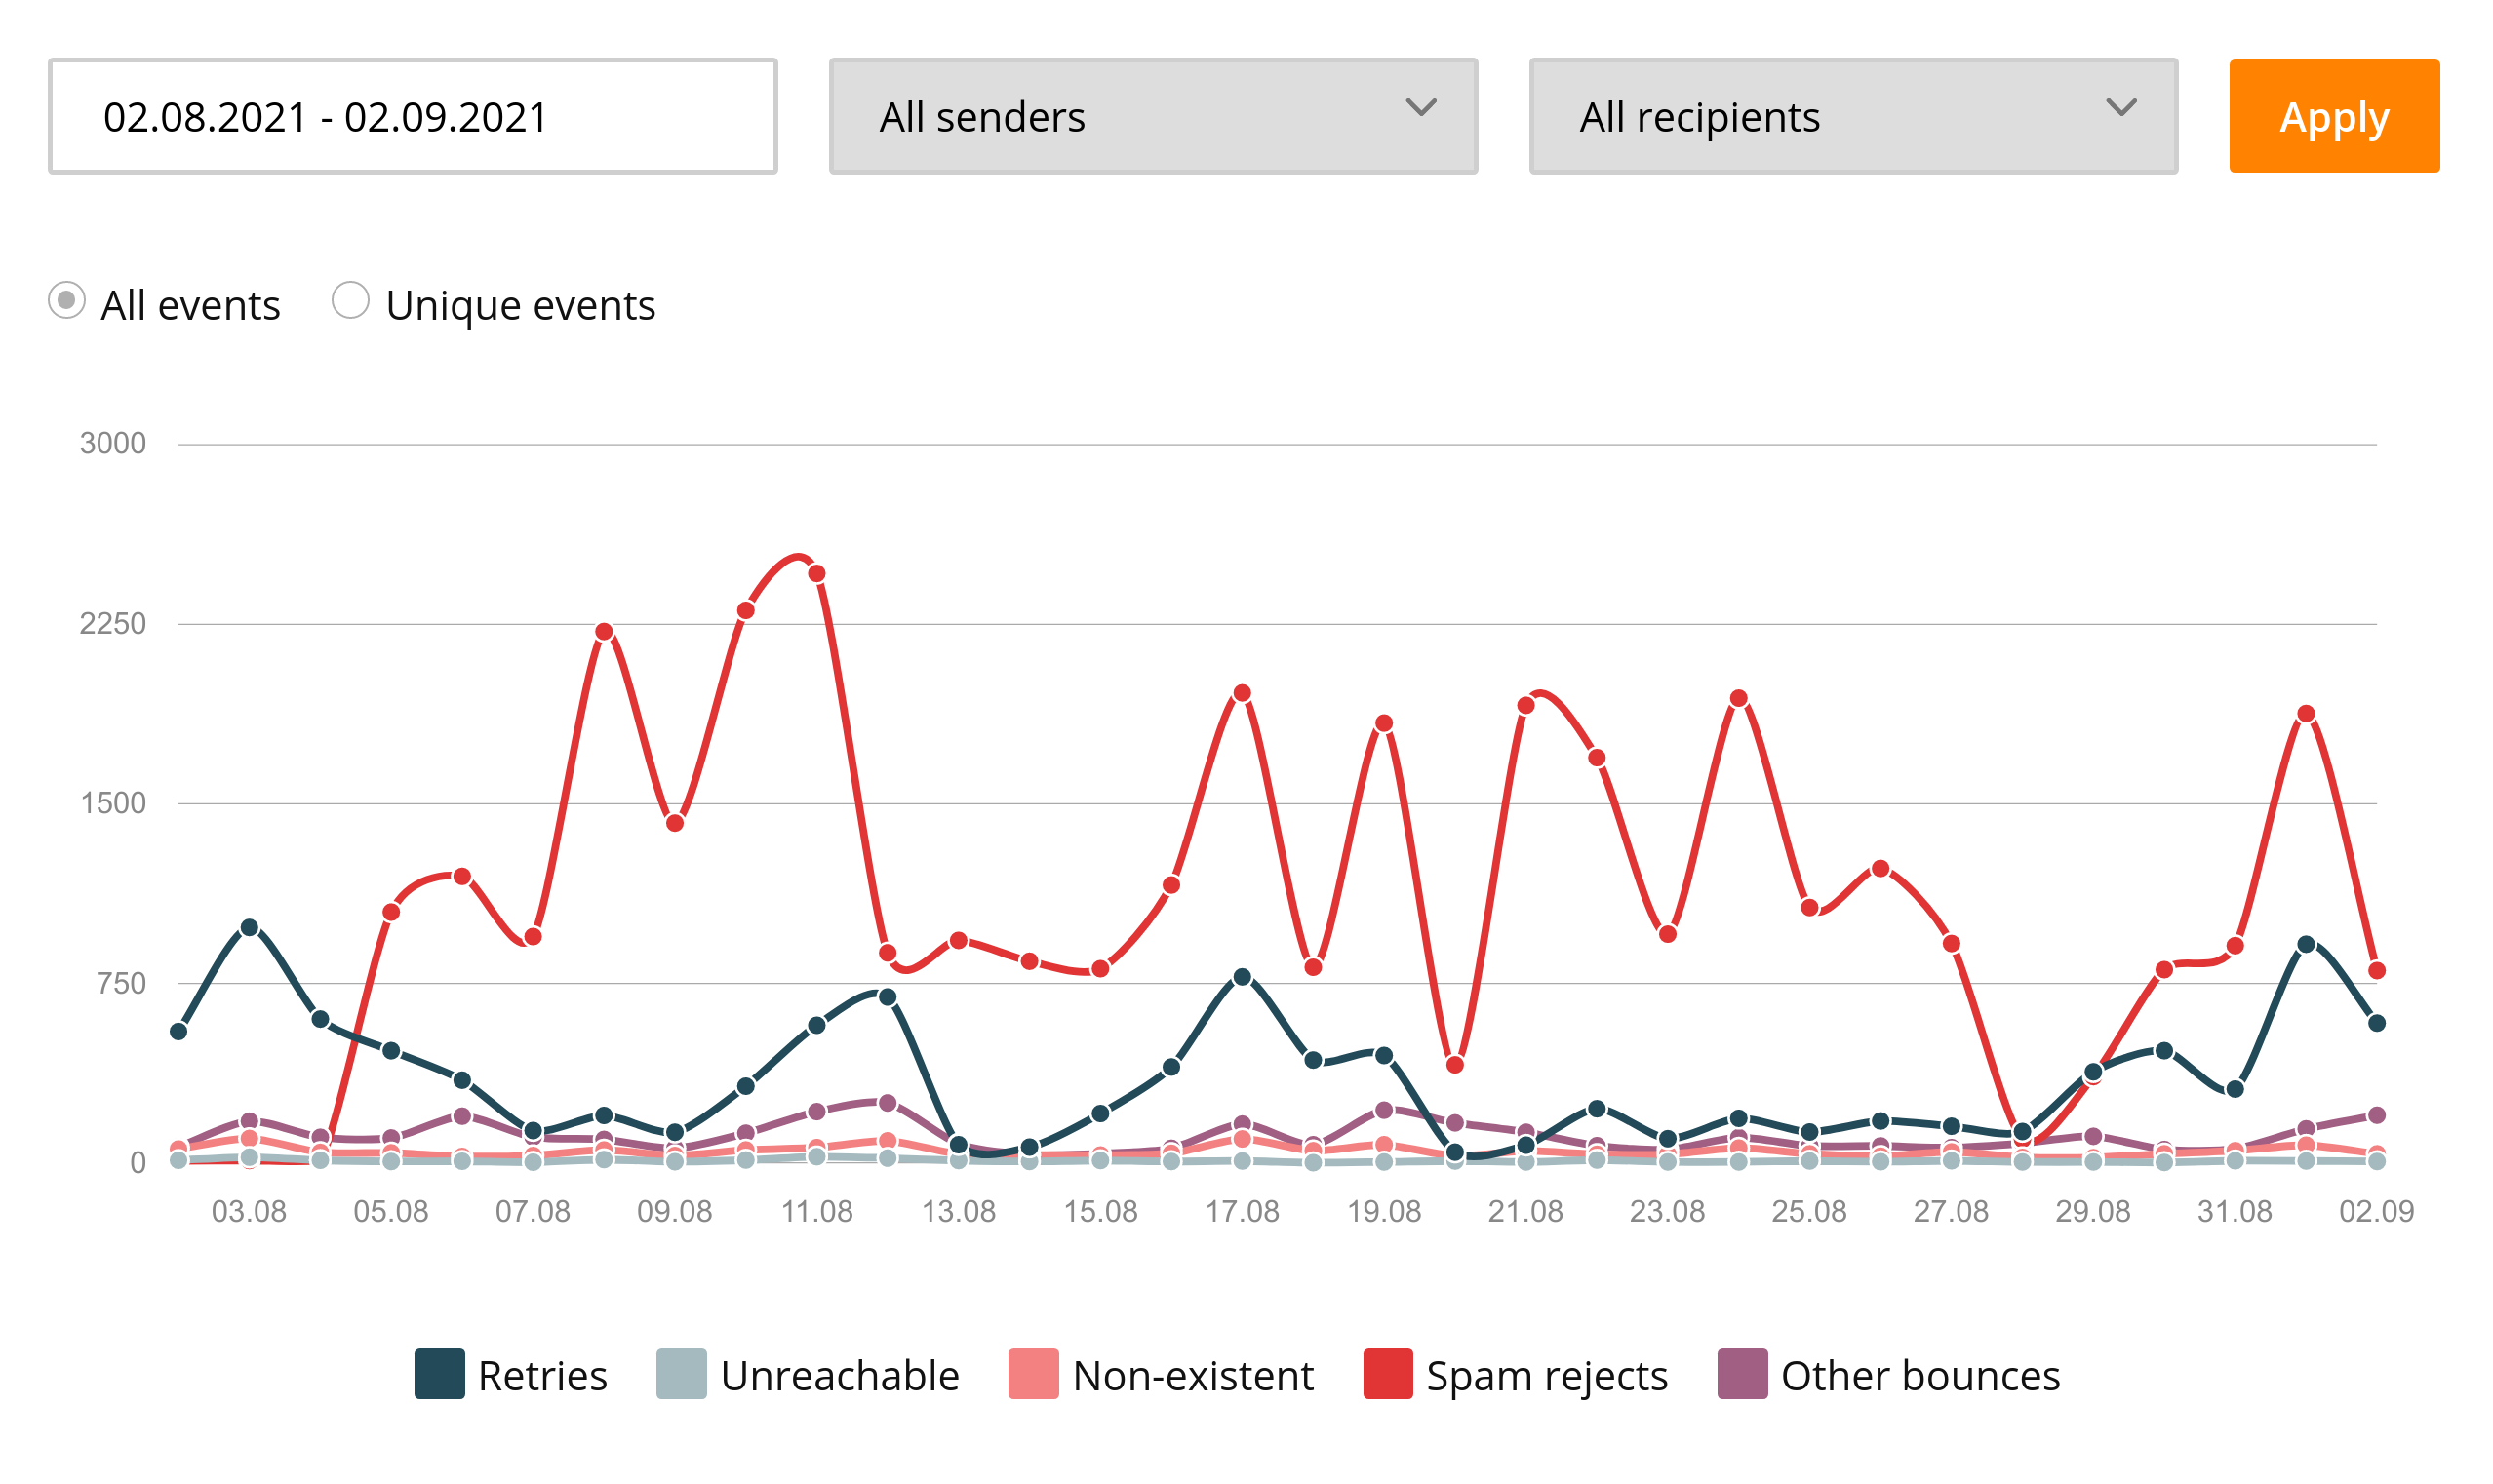
You can choose an arbitrary period within these 32 days. If the period is one day, then a detailed hourly breakdown of events for those 24 hours will be shown, if the period is more than a day, then the breakdown will be daily.
In this case, the “day” is defined by the UTC time zone.
You can filter events by selecting sender email address and / or recipient domain. Do not forget to click the "Apply" button after changing dates or sender/recipient filters to update the graph.
You can choose one of two data display modes:
All events - in this mode, each delivery failure event is counted and leads to an increase in the number of events of a defined failure type on the day that the event occurred (or per hour, if the statistics are broken down by hour). For example, a message which has been rejected as spam after 10 retries will be counted as sent 9 times and rejected as spam one time.
Unique events - this mode counts only events that are unique for a single message within a day (or an hour for an hourly breakdown). If during the day there were several repeated attempts to deliver the email, then only one retry will be counted.
Events are divided into the following groups:
Statistics for the current day may be a little late as it takes some time to process and index the data. Usually, this delay will not exceed an hour.
If you are using projects, then in the upper left corner of the screen you can switch to viewing statistics for a single project, for the main project (main account), or select “all projects” to view summary statistics for all projects at once.
In this report, you can see the data on the delivery events of your email messages for the last 32 days, today included:
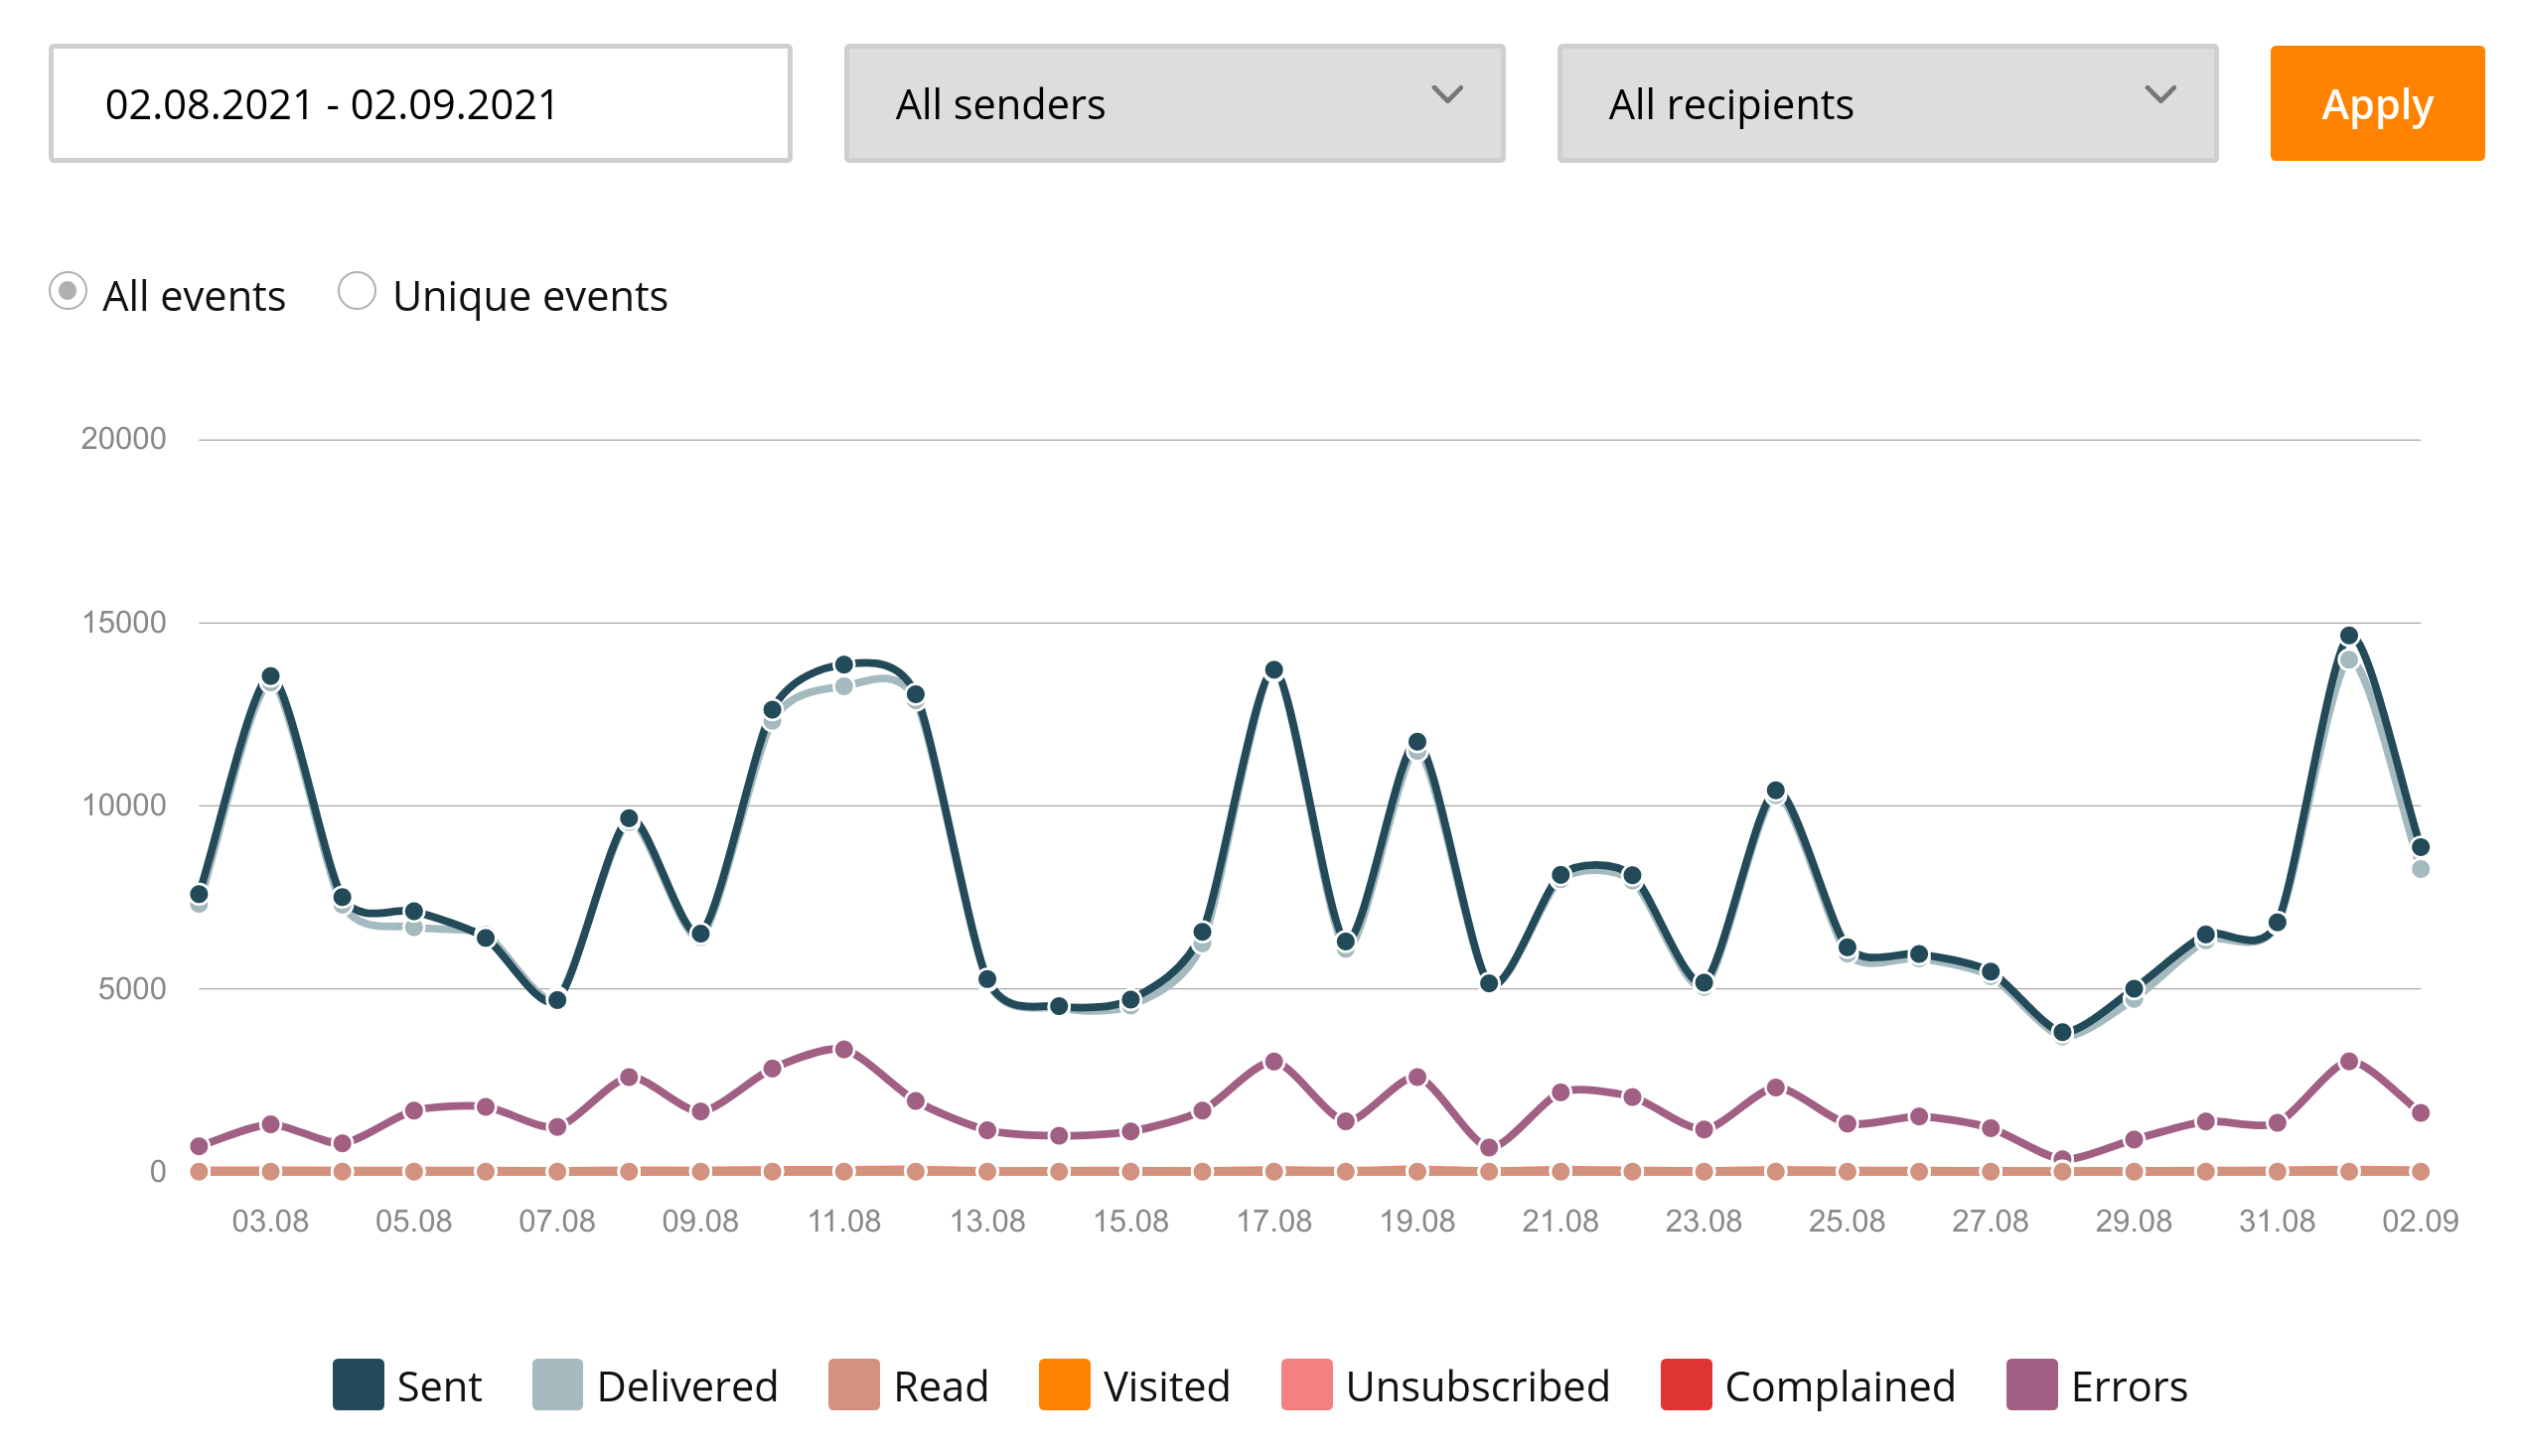
You can choose any particular period within these 32 days. If that period is one day, then a detailed hourly breakdown of events for those 24 hours will be shown, if the period is more than a day, then the breakdown will be daily.
In this case, the definition of any day is determined by the UTC time zone.
You can filter events by selecting sender email address and / or recipient domain. Do not forget to click the "Apply" button after changing dates or sender/recipient filters to update the graph.
You can choose one of two data display modes:
Events are divided into the following groups:
Statistics for the current day may be a little late, as it takes some time to process and index the data. As a rule, the delay will not exceed an hour.
If you are using projects, then in the upper left corner of the screen you can switch to view statistics for a single project, for the main project (main account), or select “all projects” to view summary statistics for all your projects at once.
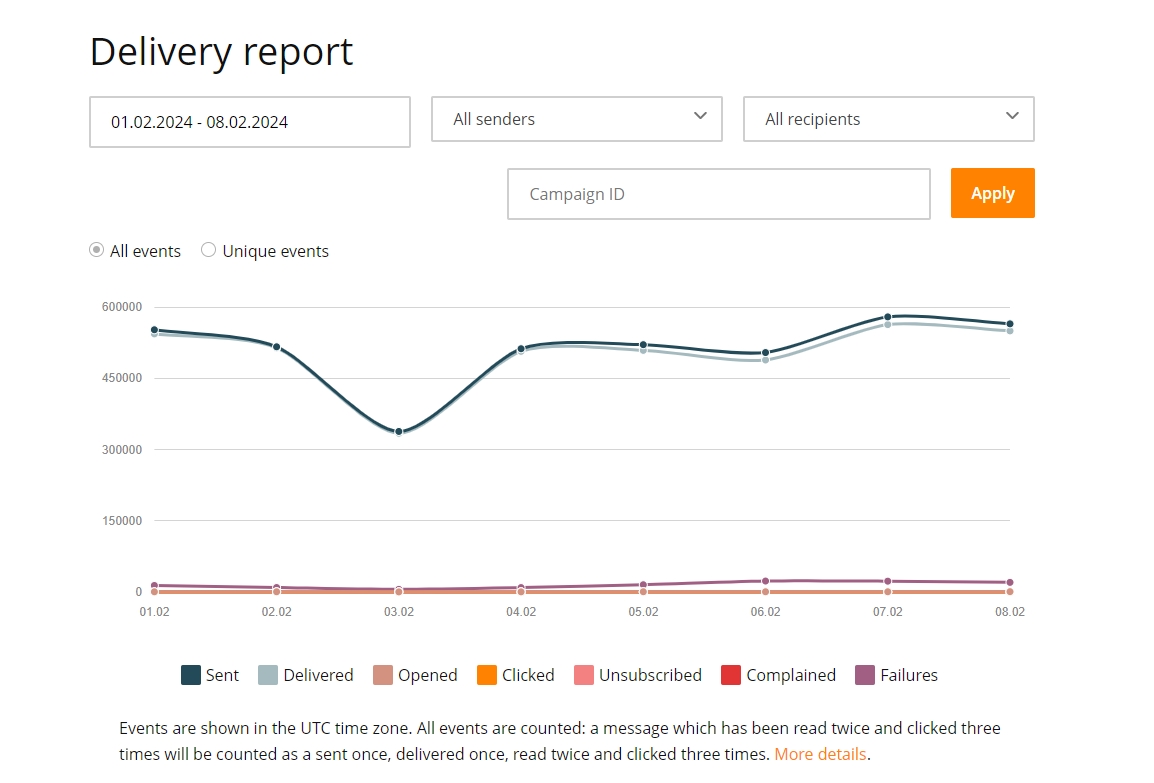
In UniOne, statistics can be obtained in several different ways:
If you need detailed visual statistics, then open "Statistics" menu section in UniOne control panel.
In the delivery report, you can see the success of your mailing for the last month broken down into different sections - taking into account the sending address and the delivery domain, with daily or hourly details, the absolute number of all events or only unique reads / transitions.
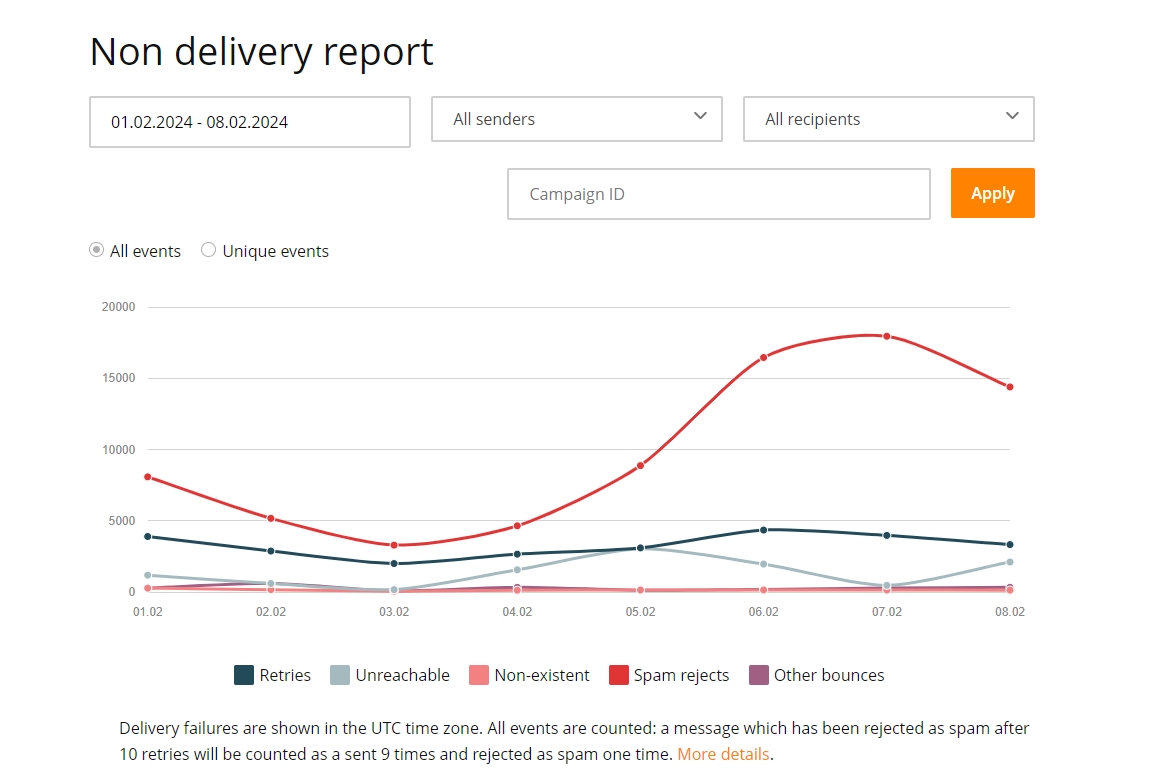
In the non-delivery report, you can study the reasons for any non-deliveries in the last month to understand how to fix the situation. Here, too, there is the possibility of filtering by sending address or domain, there is also a daily or hourly detailing. And don't forget that UniOne also provides you with the ability to view last week's SMTP error messages directly from the recipient servers for each individual email on the Delivery Issues page.
When you log in, you will see the latest deliverability summary on the home page. It is simple, in comparison with the statistics section - the data is shown only for the last week and without the possibility of filtering. But on the other hand, it is updated in real time, in contrast to the more functional, but slightly lagging statistics section.
A set of API methods used to obtain a list of events for a given time period in CSV format. Data is stored for up to 45 days, depending on your tariff. This means that you can request data starting from 00:00:00 45 days ago and up to the current time. For high volume senders, the period defaults to 7 days and may be extended upon request. You can limit the report to certain recipient and sender addresses, campaign IDs, etc. using filters.
If you need both real-time and the most detailed information at the same time, then you can connect through the Webhook API notifications about all events that occur with each email you send. This includes e.g. the links clicked, information about the user's browser or responses from SMTP servers. To do this, you will need to program a notification handler, but with detailed documentation this is not so difficult, and we recommend this method to you if you are looking to develop a serious solution. Benefits include:
Working with the transactional emails service UniOne you may encounter instances of the system blocking the delivery of your emails, causing them to not reach their destination.
According to the company's anti-spam policy, UniOne provides automatic spam blocking. Perhaps sending from your account to some domains has been blocked.
Information about outgoing UniOne SMTP servers and recipient domains blocking can be obtained by a webhook (setting event “spam_block” : [“*”]).
The information will be returned as follows:
 {
            "event_name":"transactional_spam_block",
            "event_data":
            {
              "block_time":"YYYY-MM-DD HH:MM:SS",
              "block_type":"one_smtp",
              "domain":"domain_name",
              "SMTP_blocks_count":8,
              "domain_status":"blocked"
             }
 }
where:
block_time - outgoing SMTP blocking time (UTC)
block_type - can return one_smtp (if a single SMTP was blocked), all_smtp (if all SMTPs were blocked for the recipient’s domain)
domain - recipient’s domain name
SMTP_blocks_count - counter that shows the quantity of the blocked SMTP
domain_status - can return blocked or unblocked (shows whether the current domain is allowed to send to)
If you have a problem with sending to a particular domain and this domain is restricted but you are sure that the content you are sending is acceptable (not spam), feel free to contact the support to solve your problem.
Visual editor allows you to create an email which will look equally attractive on your laptop, mobile or tablet.
An email is comprised of horizontal rows, which in turn may contain one or more diverse blocks: texts, images, buttons, or videos. By default a new email consists of one row containing one block. You can add more rows with the necessary number of blocks by switching to the ROWS tab and dragging the appropriate preset row onto your email.

Next, you add the required content to each block by switching to the CONTENT tab and dragging the necessary content type onto the related block.

Each row can be deleted or duplicated at need. When you left click any unused area inside the row, a small menu pops up on the right containing a trash icon (click to delete the row) and a double-square icon (click to duplicate the row). A four-arrow handle also appears on the left, allowing you to relocate the row.

When a row is selected, the ROWS tab shows a number of properties for this row. You may adjust the number of columns, change background colors and more.
If you click any block instead, the same icons and handle will apply to this block only.

If you click the Revert button in the lower right corner of the editor, you will cancel your most recent action. A click on the timer icon shows the entire editing history.

When you are satisfied with the result, click the “Continue” button in the upper right corner. The editor will close and you will see the result in preview mode. IMPORTANT NOTICE: the template is not yet saved, as other properties might have been changed. To save the entire template, including your design changes, you must then click the "Save" button.
The unsubscribe link is your ally and should be present in every email, whether transactional or mass mailing. Anti-spam systems take it into account when deciding if the letter is SPAM, and if the link is missing, an addressee might issue a SPAM complaint instead of simply unsubscribing, which is bad for your sender reputation. For these reasons UniOne appends an unsubscribe block to every email.
The unsubscribe footer contains a reference to the original target address (so that the reader always knows the correct address even if the email has been redirected a few times) as well as the unsubscribe link which leads to an unsubscribe page with a neutral visual theme. The language of both the unsubscribe footer and unsubscribe page is set by the corresponding API call URI, or by the "global_language" parameter found in the X-UNIONE header if the email is sent with SMTP. Languages supported for now: be, de, en, es, fr, it, pl, pt, ru, ua.
In addition to the visible unsubscribe footer, UniOne also adds the List-Unsubscribe email header which provides a link for instant unsubscribing. Many email clients and services make use of this header by adding an Unsubscribe button.
UniOne keeps track of all unsubscribed addresses and will deny sending any further emails to them. To find out whether a particular address is unsubscribed, you may use the suppression/get API method for a particular address, or the suppression/list method to obtain the full list of unsubscribed addresses (where "cause"="unsubscribed"). Alternatively, you may use your personal account on the Email search page to manually lookup an address. You can reset the 'unsubscribed' status via suppression/delete API method, or manually using the Email Search page, or by sending a new invitation email with email/subscribe method.
You have the option to adjust the placement and appearance of the unsubscribe link according to your requirements. You only need to insert the link into your email body wherever you wish. The exact link format depends on the template engine you are using. You currently have two options to choose from:
In most cases, you may also need to disable the default unsubscribe footer, in order to avoid unnecessary duplication (see below for instructions). The same applies if you are creating your own customized unsubscribe page and add the corresponding link to your emails. In this case you need to implement such a page on your own site, and you are also taking the responsibility of processing unsubscribe requests.
In order to cancel adding our unsubscribe footer to all or some of your emails, you will need to contact our tech support. Depending on your mailing volumes and usage statistics this may also require signing an additional responsibility agreement with your company.
The following two options are available:
You need to select one of the above options while placing your support request. We recommend using dynamic disabling as the most flexible option.
The List-Unsubscribe header value may be set by using the options.unsubscribe_url parameter of the email/send method. We strongly advise that you do not neglect this possibility. It is also recommended that the link cancels the addressee's subscription directly, without further confirmation -- this is required for proper support by many email clients such as Gmail.
As mentioned above, if our unsubscribe link is disabled, you take the sole responsibility of processing unsubscribe requests. To maintain good delivery rates, be sure to never send emails to unsubscribed addresses. If you would prefer to double check this, be sure to call the suppression/set method with "cause"="unsubscribed" for each unsubscribe request you process; the addresses will be tagged as unsubscribed on our side too.
Projects are a convenient way of managing subscriptions with different themes. If an addressee unsubscribes from a particular project, it does not affect his/her subscription to other projects.
If you are already using the unsubscribe link disabling, you may disable it for a certain project while not disabling for other ones:
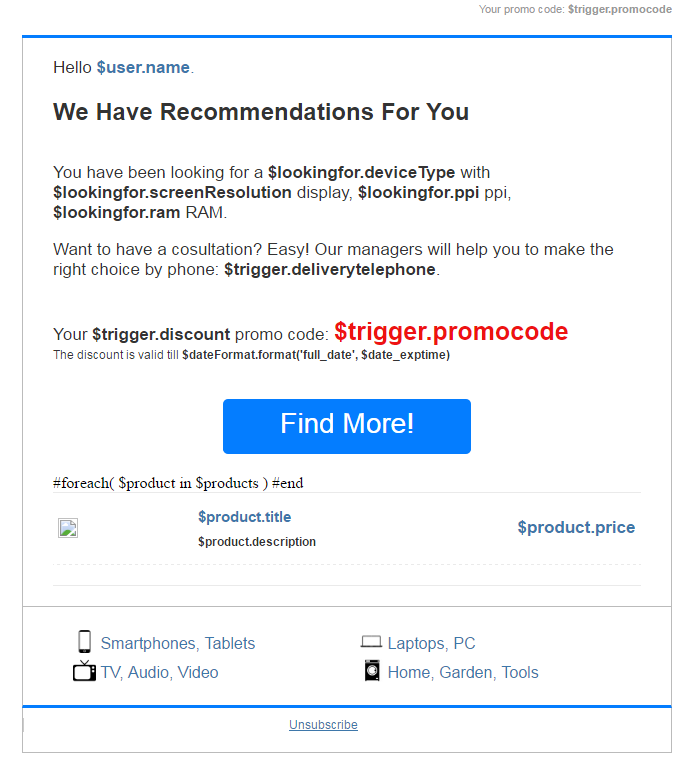
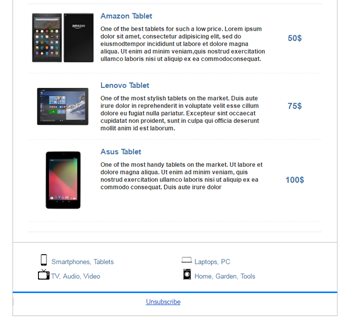
First, create the email body without substitutions in order to have an idea of the final design of the letter in the recipient's inbox.
The substitutions can be set in the parameters substitutions and global_substitutions of email/send, or in the parameter global_substitutions of template/set. The substitutions can be used in the following parameters:
Replace the changing content in body and other parameters (see above the parameters in which it is possible to use substitutions) by the substitutions using use cases. Add the substitutions structure and other parameters according to the method documentation.
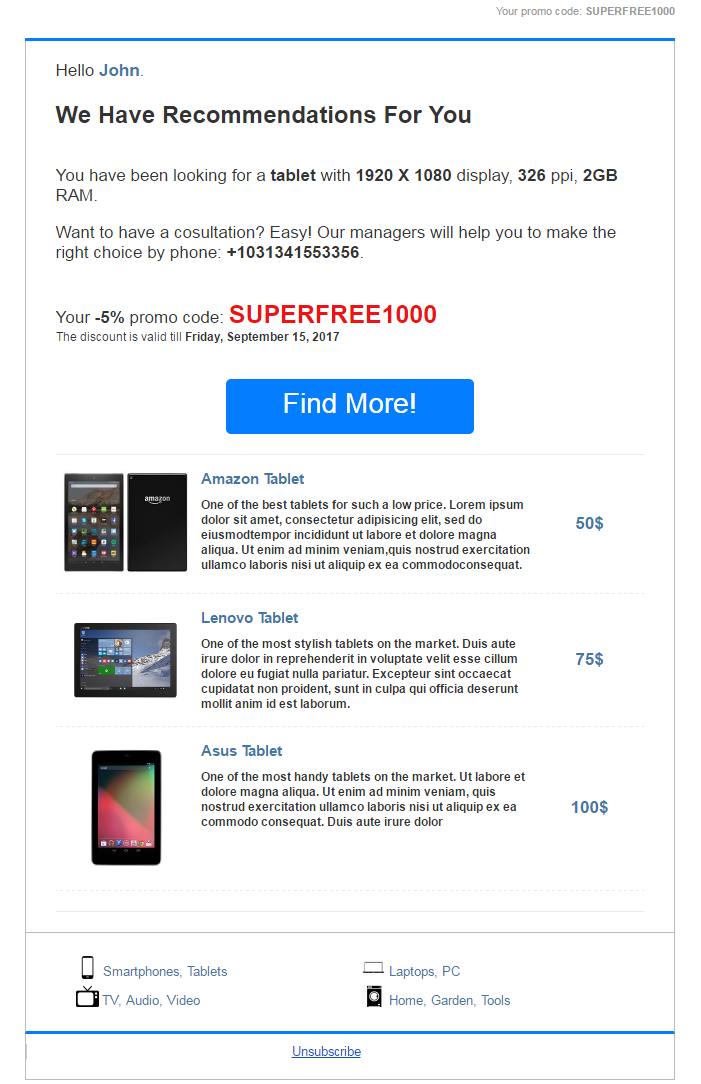
View HTML email body with substitutions. The result is as follows:
|
1
2
3
4
5
6
7
8
9
10
11
12
13
14
15
16
17
18
19
20
21
22
23
24
25
26
27
28
29
30
31
32
33
34
35
36
37
38
39
40
41
42
43
44
45
46
47
48
49
50
51
52
53
54
55
56
57
58
59
60
61
62
63
64
65
66
67
|
{ "api_key": "KEY", "message": { "template_engine" : "velocity", "body": { "html": "<!DOCTYPE html PUBLIC \"-//W3C//DTD XHTML 1.0 Transitional//EN\" \"http://www.w3.org/TR/xhtml1/DTD/xhtml1-transitional.dtd\"><html xmlns=\"http://www.w3.org/1999/xhtml\"> <head> <meta http-equiv=\"Content-Type\" content=\"text/html; charset=utf-8\"/> <title>Untitled Document</title> </head><body> <table width=\"600\" border=\"0\" align=\"center\" cellpadding=\"0\" cellspacing=\"0\"> <tr> <td style=\"text-align:right; vertical-align:middle;\"> <span style=\"color:#999999; font-size:11px; font-family:Arial, Helvetica, sans-serif; line-height:normal;\">Your promo code: $trigger.promocode</span> </td></tr><tr> <td height=\"10\" style=\"line-height:10px; height:10px;\"> </td></tr><tr> <td height=\"10\" style=\"border-bottom:#047DFF 3px solid; line-height:10px; height:10px;\"> </td></tr><tr> <td height=\"20\" style=\"border-left:#bbbbbb 1px solid; border-right:#bbbbbb 1px solid;\"> </td></tr><tr> <td style=\"border-left:#bbbbbb 1px solid; border-right:#bbbbbb 1px solid; padding:0 30px 0 30px;\"> <span style=\"font-family:Arial, Helvetica, sans-serif; color:#333333; font-size:17px;\">Hello<a href=\"#\" style=\"color:#3e77aa; text-decoration:none;\"> $user.name.</a></span> </td></tr><tr> <td height=\"20\" style=\"border-left:#bbbbbb 1px solid; border-right:#bbbbbb 1px solid;\"> </td></tr><tr> <td style=\"border-left:#bbbbbb 1px solid; border-right:#bbbbbb 1px solid; padding:0 30px 0 30px;text-align: left\"> <span style=\"font-family:Arial, Helvetica, sans-serif; color:#333333;font-weight:bold; font-size:24px; line-height:normal;\">We Have Recommendations For You </span> </td></tr><tr> <td height=\"20\" style=\"border-left:#bbbbbb 1px solid; border-right:#bbbbbb 1px solid;\"> </td></tr><tr> <td style=\"border-left:#bbbbbb 1px solid; border-right:#bbbbbb 1px solid; padding:0 30px 0 30px;\"> <p style=\"font-family:Arial, Helvetica, sans-serif; color:#333333; font-size:17px; line-height:normal;\">You have been looking for a $lookingfor.deviceType with $lookingfor.screenResolution display, $lookingfor.ppi ppi, $lookingfor.ram RAM. </p><p style=\"font-family:Arial, Helvetica, sans-serif; color:#333333; font-size:17px; line-height:normal;\">Want to have a cosultation? Easy! Our managers will help you to make the right choice by phone: $trigger.deliverytelephone. </p></td></tr><tr> <td height=\"20\" style=\"border-left:#bbbbbb 1px solid; border-right:#bbbbbb 1px solid;\"> </td></tr><tr> <td style=\"border-left:#bbbbbb 1px solid; border-right:#bbbbbb 1px solid;\"> <table width=\"100%\" border=\"0\" cellspacing=\"0\" cellpadding=\"0\"> <tr> <td width=\"30\"> </td><td style=\"text-align:left; vertical-align:middle;\"><span style=\"font-family:Arial, Helvetica, sans-serif; color:#333333; font-size:17px; line-height:normal; \">Your $trigger.discount promo code: <span style=\"font-family:Arial, Helvetica, sans-serif; color:#ee1212; font-size:25px;\">$trigger.promocode</span></span></td><td width=\"30\"> </td></tr><tr> <td width=\"30\"> </td><td style=\"text-align:left; vertical-align:middle;\"><span style=\"font-family:Arial, Helvetica, sans-serif; color:#333333; font-size:12px; line-height:normal; \">The discount is valid till $dateFormat.format('full_date', $date_exptime)</td><td width=\"30\"> </td></tr></table> </td></tr><tr> <td style=\"border-left:#bbbbbb 1px solid; border-right:#bbbbbb 1px solid; height:35px\"> </td></tr><tr> <td style=\"border-left:#bbbbbb 1px solid; border-right:#bbbbbb 1px solid;\"> <table border=\"0\" cellpadding=\"0\" cellspacing=\"0\" style=\"width: 648px;\"> <tbody> <tr> <td width=\"200\"> </td><td><div style=\"text-align: center; vertical-align: middle; -webkit-border-radius: 5px; -moz-border-radius: 5px; border-radius: 5px; background-color:#047DFF; border-bottom: #047DFF 5px solid;\"><span style=\"color:#cccccc\"><a href=\"#\" style=\"color: #ffffff; font-size: 28px; text-decoration: none; font-family: Arial, Helvetica, sans-serif; line-height:50px;\" target=\"_blank\">Find More!</a></span></div></td><td width=\"200\"></td></tr></tbody> </table> </td></tr><tr> <td height=\"20\" style=\"border-left:#bbbbbb 1px solid; border-right:#bbbbbb 1px solid;\"> </td></tr><tr> <td style=\"border-left:#bbbbbb 1px solid; border-right:#bbbbbb 1px solid;\"> <table width=\"648\" border=\"0\" cellspacing=\"0\" cellpadding=\"0\"> <tr> <td width=\"30\"> </td><td align=\"left\" valign=\"top\" style=\"text-align:left; vertical-align:top;\"> <table width=\"100%\" border=\"0\" cellpadding=\"0\" cellspacing=\"0\"> <tr> <td style=\"border-bottom:#eaeaea 1px solid\"> <table width=\"100%\" border=\"0\" cellspacing=\"0\" cellpadding=\"5\"> </table> </td></tr>#foreach( $product in $products ) <tr> <td style=\"border-bottom:#eaeaea 1px dashed; padding-bottom:10px; padding-top:10px;\"> <table width=\"100%\" border=\"0\" cellspacing=\"0\" cellpadding=\"5\"> <tr> <td width=\"130\" rowspan=\"2\"><a href=\"$product.url\"><img src=\"$product.imgUrl\" width=\"130\"/></a></td><td width=\"330\" height=\"15\"><span style=\"font-family:Arial, Helvetica, sans-serif; color:#333333; font-size:15px;\"><a href=\"$product.url\" target=\"_blank\" style=\"color:#3e77aa; text-decoration:none;\">$product.title</a></span></td><td rowspan=\"2\" align=\"center\"><span style=\"font-family:Arial, Helvetica, sans-serif; color:#3e77aa; font-size:17px;\">$product.price</span></td></tr><tr> <td width=\"330\" valign=\"top\"><span style=\"font-family:Arial, Helvetica, sans-serif; color:#333333; font-size:12px;\">$product.description</span></td></tr></table> </td></tr>#end <tr> <td style=\"border-bottom:#eaeaea 1px solid; padding-bottom:10px; padding-top:10px;\"> <table width=\"100%\" border=\"0\" cellspacing=\"0\" cellpadding=\"5\"> </table> </td></tr></table> </td><td width=\"30\" align=\"center\" valign=\"top\" style=\"text-align:center; vertical-align:top;\"> </td></tr></table> </td></tr><tr> <td height=\"20\" style=\"border-left:#bbbbbb 1px solid; border-right:#bbbbbb 1px solid;\"> </td></tr><tr> <td height=\"20\" style=\"border-left:#bbbbbb 1px solid; border-right:#bbbbbb 1px solid; border-top:#bbbbbb 1px solid; height:20px; line-height:20px;\"> </td></tr><tr> <td style=\"vertical-align:top;border-bottom: 3px solid #047DFF; border-left:#bbbbbb 1px solid; border-right:#bbbbbb 1px solid; font-family:Gotham, 'Helvetica Neue', Helvetica, Arial, sans-serif; text-align:left\"> <table cellpadding=\"0\" cellspacing=\"0\" style=\"border:0;border-collapse:collapse;width:100%\"> <tbody> <tr> <td width=\"50\"> </td><td style=\"vertical-align:middle;height:29px\"> <a href=\"#\" target=\"_blank\" style=\"color:#3e77aa;text-decoration:none\"> <img src=\"http://unisenderfiles.storage.unisender.com/KBpictures/UniOne/smart.png\" alt=\"Телефоны, MP3\" title=\"Телефоны, MP3\" width=\"23\" height=\"23\" style=\"border:0;vertical-align:bottom;\"> Smartphones, Tablets </a> </td><td style=\"vertical-align:middle;height:29px\"> <a href=\"#\" target=\"_blank\" style=\"color:#3e77aa;text-decoration:none\"> <img src=\"http://unisenderfiles.storage.unisender.com/KBpictures/UniOne/lap.jpg\" alt=\"Ноутбуки, планшеты и ПК\" title=\"Ноутбуки, планшеты и ПК\" width=\"23\" height=\"23\" style=\"border-width:0;vertical-align:bottom\"> Laptops, PC </a> </td><td width=\"30\"> </td></tr><tr> <td width=\"50\"> </td><td style=\"vertical-align:middle;height:29px\"> <a href=\"#\" target=\"_blank\" style=\"color:#3e77aa;text-decoration:none\"> <img src=\"http://unisenderfiles.storage.unisender.com/KBpictures/UniOne/tv.png\" alt=\"Аудио, Видео, Фото\" title=\"ТВ, Аудио, Видео, Фото\" width=\"23\" height=\"23\" style=\"border-width:0;vertical-align:bottom\"> TV, Audio, Video </a> </td><td style=\"vertical-align:middle;height:29px\"> <a href=\"#\" target=\"_blank\" style=\"color:#3e77aa;text-decoration:none\"> <img src=\"http://unisenderfiles.storage.unisender.com/KBpictures/UniOne/home.png\" alt=\"Бытовая техника и интерьер\" title=\"Бытовая техника и интерьер\" width=\"23\" height=\"23\" style=\"border-width:0;vertical-align:bottom\"> Home, Garden, Tools </a> </td><td width=\"30\"> </td></tr><tr> <td height=\"20\" width=\"50\"> </td><td> </td><td> </td><td width=\"30\"> </td></tr></tbody> </table> </td></tr><tr> <td height=\"10\" style=\"border-left:#bbbbbb 1px solid; border-right:#bbbbbb 1px solid; line-height:10px; height:10px;\"> </td></tr><tr> <td style=\"border-left:#bbbbbb 1px solid; border-right:#bbbbbb 1px solid; \"> <table width=\"600\" border=\"0\" cellspacing=\"0\" cellpadding=\"0\"> <tr> <td width=\"600\" align=\"center\" valign=\"middle\" style=\"border-left:#CCC 1px solid; text-align:center; vertical-align:middle;\"><a href=\"#\" target=\"_blank\" style=\"color:#666666; font-size:12px; font-family:Arial, Helvetica, sans-serif; color:#3e77aa; line-height:normal;\">Unsubscribe</a> </td></tr></table> </td></tr><tr> <td height=\"20\" style=\"border-left:#bbbbbb 1px solid; border-right:#bbbbbb 1px solid; border-bottom:#bbbbbb 1px solid; height:20px;\"> </td></tr></table> </body></html>" }, "subject": "Recommendations", "from_email": "sender@mail.com", "from_name": "SENDER", "recipients": [ { "email": "recipient@mail.com", "substitutions": { "date_exptime":"15/09/2017", "user": { "name":"John" }, "trigger": { "promocode":"SUPERFREE1000", "deliverytelephone":"+1031341553356", "discount":"-5%" }, "lookingfor": { "deviceType":"tablet", "screenResolution":"1920 X 1080", "ppi":"326", "ram":"2GB" }, "products": [ { "title":"Amazon Tablet", "price":"50$", "description":"One of the best tablets for such a low price. Lorem ipsum dolor sit amet, consectetur adipisicing elit, sed do eiusmodtempor incididunt ut labore et dolore magna aliqua. Ut enim ad minim veniam,quis nostrud exercitation ullamco laboris nisi ut aliquip ex ea commodoconsequat. ", "url":"#" } , { "title":"Lenovo Tablet", "price":"75$", "description":"One of the most stylish tablets on the market. Duis aute irure dolor in reprehenderit in voluptate velit esse cillum dolore eu fugiat nulla pariatur. Excepteur sint occaecat cupidatat non proident, sunt in culpa qui officia deserunt mollit anim id est laborum.", "url":"" } , { "title":"Asus Tablet", "price":"100$", "description":"One of the most handy tablets on the market. Ut labore et dolore magna aliqua. Ut enim ad minim veniam, quis nostrud exercitation ullamco laboris nisi ut aliquip ex ea commodo consequat. Duis aute irure dolor", "url":"#" } ] } } ] }} |
We make every effort to ensure the highest possible delivery rates. While the delivery result of any one particular email is not always guaranteed (for many reasons, including not only the letter itself and its originating server reputation, but also certain settings of the target mail server), we at UniOne consistently maintain a delivery rate as high as 99.8%. To achieve this excellent performance we use the following techniques and practices.
We conform to all major standards of email authentication, including SPF, DKIM and DMARC. The same is required of our customers. For this reason we ensure that all our clients verify their domain ownership by adding the required records to the Domain Naming Service (DNS) database. This one-time procedure is necessary to guarantee that your sender reputation is in no way influenced by other customers of our service. The validity of your DNS records will be automatically re-checked on a schedule, and we will inform you if something goes wrong.
We constantly monitor all major black lists and sender reputation services for our IP addresses. In case a match is found, we promptly investigate the reason and delist the shared IP address. If you are using a dedicated IP address, we will immediately let you know so that you are able to delist the address yourself.
Delivery of all your emails to addressee domains is monitored in real time. In case a particular domain starts rejecting all your emails, we will temporarily pause outbound email to this domain and notify you via web hook API and by email. We cannot investigate every such occurrence, but we do provide the tools you need to locate the cause. However, in the case of transaction emails such events are extremely rare. In case of mass mailing they can also be avoided, with due respect to certain "email sanity" practices.
We make use of the Feedback Loop (FBL) services provided by most major email services. This allows us to track not only the delivery result for any particular letter, but also to be notified when an addressee hits the SPAM button. Such events are forwarded to the customer via webhook and made visible in delivery statistics. We also block sending further emails to this address, to keep your sender reputation safe.
An unsubscribe link is added to every letter by default. Omitting such link would result in high numbers of spam complaints, which in turn could severely downgrade your sender reputation and delivery rate. However, you also have the option to change the appearance of our default unsubscribe block or even implement your own unsubscribe mechanism and notify us via an API call.
All of the above measures help us maintain high delivery rates.
Allows you to access the variables found in the substitutions object.
Substitution example: (parameter global_substitutions — email/send, template/set ; substitutions — email/send):
...
"substitutions":
{
    "person":
    {
        "name":"John",
        "secondName":"Doe",
        "age":"26"
    }
}
Usage example: (parameters body.html, body.plaintext, body.amp, subject, headers, options.unsubscribe_url, from_name — email/send, template/set):
"html":"<h1>Hello, $person.name $person.secondName !</h1>"
Returns and iterates the elements of the array of substitutions.
Substitution example: (parameter global_substitutions — email/send, template/set ; substitutions — email/send):
...
 "substitutions":
        {
          "petList":
            [
                {
                  "name":"John",
                  "price":"30"
                },
                {
                  "name":"Harold",
                  "price":"15"
                }
            ]
        }
Usage example: (parameters body.html, body.plaintext, body.amp, subject, headers, options.unsubscribe_url, from_name — email/send, template/set):
"html":
 "#foreach( $pet in $petList )
    $pet.name for only $pet.price
 #end"
Substitution example: (parameter global_substitutions — email/send, template/set ; substitutions — email/send):
...
 "substitutions":
        {
          "DogsAndCats":
            [
              {
               "pet":
                 [
                  {
                   "concreteAnimal":"Brown Cat"
                  }
                 ]
              }
            ]
        }
Usage example: (parameters body.html, body.plaintext, body.amp, subject, headers, options.unsubscribe_url, from_name — email/send, template/set):
"html":
"#foreach( $pet in $DogsAndCats)
  #foreach( $concreteAnimal in $pet.pet)
    Buy this $concreteAnimal.concreteAnimal
  #end
#end"
Сalls the array element with a specified index.
Substitution example: (parameter global_substitutions — email/send, template/set ; substitutions — email/send):
...
 "substitutions":
        {
          "petList":
            [
                {
                  "name":"John",
                  "price":"30"
                }
            ]
        }
Usage example: (parameters body.html, body.plaintext, body.amp, subject, headers, options.unsubscribe_url, from_name — email/send, template/set):
"html":
"$petList.get(0).get("name")"
Returns the current array index.
Substitution example: (parameter global_substitutions — email/send, template/set ; substitutions — email/send):
...
 "substitutions":
        {
          "catsArray":
            [
              "cat":"black"
            ]
        }
Usage example: (parameters body.html, body.plaintext, body.amp, subject, headers, options.unsubscribe_url, from_name — email/send, template/set):
"html":
"#foreach( $cat in $catsArray )
  Index of $cat is  $catsArray.indexOf($cat)
#end"
Converts the string to lowercase.
Substitution example: (parameter global_substitutions — email/send, template/set ; substitutions — email/send):
...
 "substitutions":
        {
          "UpperCASE":"TEST"
        }
Usage example: (parameters body.html, body.plaintext, body.amp, subject, headers, options.unsubscribe_url, from_name — email/send, template/set):
"html":
"$UpperCASE.toString().toLowerCase()"
Replaces URL and HTML special characters with the correct entities.
Substitution example: (parameter global_substitutions — email/send, template/set ; substitutions — email/send):
...
 "substitutions":
        {
          "url": "hello here & there",
          "html_code":"\’bread\" & \"butter\’"
        }
Usage example: (parameters body.html, body.plaintext, body.amp, subject, headers, options.unsubscribe_url, from_name — email/send, template/set):
"html":
"$esc.html($html_code)
$esc.url($url)"
Returns the "date" data type in a convenient format for further usage.
Note: the variables for substitutions of the "date" data type should begin with "date_" for correct processing, e.g. "date_Birthdate"
Available date formats:
dd/mm/yyyy
dd-mm-yyyy hh:mm:ss
yyyy/mm/dd HH:mm:ss
yyyy mm dd HH:mm:ss
ISO 8601 2004-02-12T15:19:21+00:00
RFC 2822 Thu, 21 Dec 2000 16:01:07 +0200
Substitution example: (parameter global_substitutions — email/send, template/set ; substitutions — email/send):
...
 "substitutions":
        {
          "date_Birthdate":"01/01/1970"
        }
Usage example: (parameters body.html, body.plaintext, body.amp, subject, headers, options.unsubscribe_url, from_name — email/send, template/set):
"html":
"$dateFormat.format('yyyy-M-d', $date_Birthdate)"
$dateFormat.format changes the format of the passed date. The following formats are available:
$date -> Oct 19, 2003 9:54:50 PM
$date.long -> October 19, 2003 9:54:50 PM PDT
$date.medium_time -> 9:54:50 PM
$date.full_date -> Sunday, October 19, 2003
$date.get('default','short') -> Oct 19, 2003 9:54 PM
$date.get('yyyy-M-d H:m:s') -> 2003-10-19 21:54:50
Allows you to insert if / else conditional statements into the email template.
Substitution example: (parameter global_substitutions — email/send, template/set ; substitutions — email/send):
...
 "substitutions":
        {
          "shoeSize":"5"
        }
Usage example: (parameters body.html, body.plaintext, body.amp, subject, headers, options.unsubscribe_url, from_name — email/send, template/set):
"html":
"These shoes are
  #if( $shoeSize > 5 )
      too big
  #elseif( $shoeSize < 5 )
      too small
   #else
      just right
   #end
   for my brother."
Apache Velocity template engine can handle objects and arrays substitutions using loops and if/else conditions. This will significantly reduce the time spent on the same letter templates development or development of the template parts. Using Velocity once is enough to create a pattern, which will be filled automatically by structured substitutions processed in the request. Depending on the conditions specified in the template, Velocity will handle substitutions, replacing the variables with the values or transforming their values by a given algorithm. Using complex substitutions (objects, arrays) will also reduce the size of requests, thereby increasing the processing speed, and speed up sending emails as a result.
For more information about Velocity functionality supported by UniOne: Velocity use cases
Using Velocity in UniOne allows you to use the substitutions with objects and arrays to create emails with dynamic content. This significantly reduces the size of the traffic and automates the process of creating templates with identical structures that differ only by the content.


The substitutions can be used in the following parameters (methods email/send and template/set):
This template engine substitutes data fields surrounded by double curly braces. For example, if you have recipient's name in Name field you can use this expression: {{Name}}.
There are a couple of extra possibilities also (they do not work inside links thou):
| HTML example | Description |
{ { Name|Dear Subscriber } }
|
This tag will be replaced by the value of the field “Name”, and if “Name” is empty, it will be replaced by «Dear Subscriber» as if it was a «default value» of the field. Instead of the text, you can specify the name of another field, for example:{ { Name| { { Email } } } }
|
{ { HasOrders?You have 10% discount } }
|
If the field “Has Orders” is not empty and not equals zero, it will be replaced by the text «You have 10% discount», otherwise the result will be an empty string. { { HasOrders? { { Discount } } } }
Look at more complicated example, which adds comma before the name, but only if name is not empty: Congratulations { {Name?, } } { { Name } }!
|
Each email sent with email/send method or each template referenced by group of template methods is using one of the two supported template engines:
Templates allow send emails faster and make them more personalized, so take your chance to learn their abilities.
If you see an exclamation mark in the upper left corner of your account screen along with a notice “Sending disabled”, or you receive an API error 215 error “The user is not allowed to send email”, this means that mailing has been disabled for your account.
This may happen due to the following reasons:
This measure being an extremity, we still have to resort to it on certain occasions, since UniOne’s high deliverability attracts spammers quite often.
You can send emails with UniOne using one of the following methods:
Web API - fast, efficient, and with many features allowing you to integrate it with your site through programming.
SMTP API - less throughput, but all you need to do is enter the host, login, and password - and you're ready to go.
Integrations - to use UniOne with third-party services.
We offer following integrations and libraries:
If you're interested in UniOne plugin for a particular service or need a library for another programming language, please contact our support.
Web API UniOne allows you not only to send emails lightning fast, but also to deal with unsubscribes, domains, separate projects or to get statistics with webhooks. You can browse all the methods in our Web API Reference.
All UniOne API methods require an HTTPS connection. UniOne accepts HTTP POST requests in JSON format up to 10 megabytes long and returns an HTTP response also in JSON. In case of error the JSON body with an error description and an API error code is returned, but you will also receive a corresponding HTTP return code. You can read more about error handling here.
You should send an API request to the server your account is registered at:
eu1.unione.io - european UniOne server
us1.unione.io - USA & Canada UniOne server
SMTP allows sending up to 5000 emails per hour using single connection, and with 10 maximum permitted connections it could be up to 50 000 emails per hour. Web API allows sending up to several millions emails per hour, so consider using Web API if speed is your priority. But the good news is that SMTP integration is very simple, you just need to set some connection parameters. And don't forget to read our emails about API updates or take a look on changelog periodically.
host: either smtp.us1.unione.io or smtp.eu1.unione.io (for accounts registered at us1.unione.io and eu1.unione.io, respectively).
port: 25, 465 or 587. Only encrypted TLS connections are supported, with recommended version 1.2 or higher. We provide no support neither for unencrypted port 25 SMTP connections nor for encrypted SSL connections due to security reasons. TLS 1.0 and TLS 1.1 support will be terminated in the middle of 2021.
username: user_id (you can see it in the upper left corner of the screen under your email after login) or project_id (you can get it by project/create or project/list method, and also on Projects page).
password: API key of your account or project_api_key (you can get it by project/create or project/list method, and also on Projects page)
encoding: connection encoding should be set to UTF-8
You can use extended features of UniOne while sending thru SMTP, such as substitutions(merge tags), templates, link and read tracking.To access these features you should pass an extra header X-UNIONE with parameters in JSON format. Many parameters from email/send are supported together with extra parameter "global_language". E.g.:
{
  "global_language": "en",
  "template_engine": "velocity",
  "template_id": "5c046a8b-6f6b-4f0b-a5b6-1d0ff8953ac7",
  "global_substitutions": {
    "DiscountCode":"XMAS",
    "Name": "John"
  },
  "global_metadata": {
    "meta-campaign": "transactional"
  },
  "track_links":1,
  "track_read":1,
  "skip_unsubscribe":0
}
| Name | Type | Description |
|---|---|---|
| template_engine | Optional string | Sets the template engine for handling the substitutions. Accepts values: "simple" и "velocity". If the parameter is not passed, the system will use the default value - "simple" |
| template_id | Optional string | Optional identifier of the template that had been created by template/set method or in UniOne web interface. |
| global_language | Optional string | Language used for unsubscribe footer and unsubscribe page interface. "en" by default. Supported languages: be, de, en, es, fr, it, pl, pt, ru, ua. You can ask our support if you need other languanges. |
| global_substitutions | Optional object | Object for passing the substitutions (e.g., first name of recipient). |
| global_metadata | Optional object | Object for passing the metadata, such as "key" : "value". Max key quantity: 10. Max key length: 64 symbols. Max value length: 1024 symbols. The metadata is returned by webhook. |
| track_links | Optional boolean |
|
| track_read | Optional boolean |
|
| skip_unsubscribe | Optional boolean |
In order to use skip_unsubscribe=1 value you should ask support to enable it first. |
| strict | Optional boolean |
This parameter sets the way "To:", "CC:", and "BCC:" headers are processed (see also Implementation details):
|
| tags | Optional array | An array of strings. The maximum string length is 50 characters. You can include up to 4 strings which must be unique. No more than 10 000 tags are allowed per project; if you try to add more, email/send will return an error. You may use tags to categorize emails by your own criteria, and they will be passed along by event-dump methods. |
We accept these headers:
All other headers are stripped out.
After the sending SMTP API returns Id which can be used as a value of job_id in webhooks.
