
UniOne MCP server
Connect Claude Code, Cursor, Codex and other AI agents to UniOne with MCP (Model Context Protocol), the standard way AI agents connect to external services. With the UniOne MCP server, your agent can send a first email from a sandbox domain, set up and verify your own domain, manage templates and webhooks, and check the suppression list, all from a chat.
Server URL: https://mcp.unione.io/mcp
It works with Claude Code, Cursor, Codex, VS Code, Windsurf, Gemini CLI, Claude, ChatGPT and any client that supports MCP over Streamable HTTP. The MCP server is free: you pay only for what the tools do, as with the API — emails you send and email validations.
Use MCP to set things up and check them from a chat. In your application, send email with the Web API from your server.
Choose how to connect
| Sign in to UniOne | API key | |
|---|---|---|
| Best for | Your coding agent, Claude, ChatGPT | CI, agents without a browser, project keys |
| What you add | Only the server URL | Server URL and an API key header |
| Access | Your account | The account or project the key belongs to |
| Revoke | Settings → Security → Connected applications | Regenerate the key |
Option 1. Sign in to UniOne (recommended)
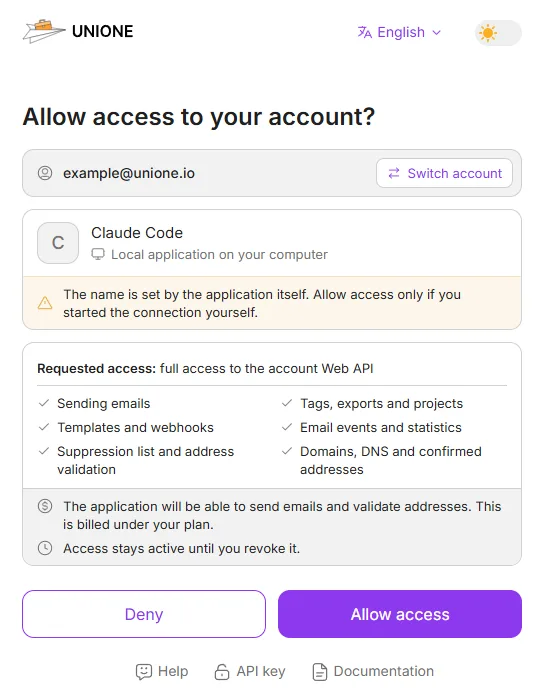
Add the server URL to your client. On the first connection, the client opens UniOne in your browser. Sign in and check the Allow access to your account? screen: the account, the application and the access it requests. Then click Allow access. The client never sees your password or API keys.
Claude Code
claude mcp add --transport http unione https://mcp.unione.io/mcpRun /mcp, select unione and choose Authenticate.
Cursor
Add to ~/.cursor/mcp.json for all projects, or to .cursor/mcp.json for one project:
{
  "mcpServers": {
    "unione": {
      "url": "https://mcp.unione.io/mcp"
    }
  }
}
Click Needs login next to the server to sign in.
Codex
codex mcp add unione --url https://mcp.unione.io/mcp
codex mcp login unione
VS Code (GitHub Copilot)
Add to .vscode/mcp.json:
{
  "servers": {
    "unione": {
      "type": "http",
      "url": "https://mcp.unione.io/mcp"
    }
  }
}
Click Start above the server name and sign in when VS Code asks.
Claude (web and desktop)
Open Settings → Connectors → Add custom connector. Enter UniOne as the name and https://mcp.unione.io/mcp as the URL, then click Connect.
ChatGPT
Open Settings → Apps & Connectors → Advanced settings and turn on Developer mode. Then click Create and enter https://mcp.unione.io/mcp as the connector URL. Custom connectors are not available on every ChatGPT plan.
Who can connect
- The account owner can connect any client.
- A teammate with shared access can connect if their role includes Connected applications. The Administrator and Developer presets include it. Otherwise, the consent screen asks them to contact the account owner.
- Signing in gives access to the whole account. To limit an agent to one project, connect with that project's API key.
Option 2. Use an API key
Use an API key for CI, agents without a browser, or to limit an agent to one project. Send the key in the Authorization header:
Authorization: Bearer <your UniOne API key>Copy the account key from API key at the top of the control panel, or a project key from Projects. Store the key in an environment variable. Never paste it into a chat or commit it to a repository.
Claude Code
claude mcp add --transport http unione https://mcp.unione.io/mcp \
  --header "Authorization: Bearer $UNIONE_API_KEY"
Cursor
{
  "mcpServers": {
    "unione": {
      "url": "https://mcp.unione.io/mcp",
      "headers": { "Authorization": "Bearer ${env:UNIONE_API_KEY}" }
    }
  }
}
Codex
Add to ~/.codex/config.toml:
[mcp_servers.unione]
url = "https://mcp.unione.io/mcp"
bearer_token_env_var = "UNIONE_API_KEY"
VS Code (GitHub Copilot)
VS Code asks for the key once and stores it securely:
{
  "inputs": [
    { "type": "promptString", "id": "unione-key", "description": "UniOne API key", "password": true }
  ],
  "servers": {
    "unione": {
      "type": "http",
      "url": "https://mcp.unione.io/mcp",
      "headers": { "Authorization": "Bearer ${input:unione-key}" }
    }
  }
}
Windsurf
Add to ~/.codeium/windsurf/mcp_config.json:
{
  "mcpServers": {
    "unione": {
      "serverUrl": "https://mcp.unione.io/mcp",
      "headers": { "Authorization": "Bearer ${env:UNIONE_API_KEY}" }
    }
  }
}
Other clients
Any MCP client that supports Streamable HTTP works with UniOne. If it supports OAuth sign-in, add only the server URL https://mcp.unione.io/mcp. Otherwise, add the header Authorization: Bearer <API key>. For example, in Gemini CLI run gemini mcp add --transport http unione https://mcp.unione.io/mcp, then /mcp auth unione to sign in.
Check the connection
Ask your agent:
Check my UniOne account.
The agent calls get_account and shows your account details.
Send your first email
The first email doesn't need DNS. Every account has a sandbox domain with DKIM and SPF already set up. Ask your agent:
Send a test email to [email protected] from the UniOne sandbox domain.
Here is what happens:
- The agent gets your sandbox domain.
- The agent adds your address as a sandbox recipient, and UniOne sends a confirmation email to it.
- Open your inbox and click the link in that email. Until you do, the sandbox doesn't send to this address. The link works once and expires in 48 hours.
- Tell the agent you've confirmed. It sends the test email and shows you the
job_id.
The sandbox is for testing: up to 10 confirmed recipients, 100 emails a day, and the domain expires after 31 days. It works only when you sign in or use the account API key, not a project key.
To email your users, send from your own domain.
Send from your own domain
The sandbox sends only to confirmed addresses. To email your users, verify your own domain. Your agent does most of the work.
- Ask your agent:
Set up example.com for sending and tell me which DNS records to add.
The agent adds the domain and shows the records: a verification record and DKIM.
- Add the records to your domain's DNS. If your agent can manage your DNS, for example through your DNS provider's MCP server or CLI, it can add them for you. Otherwise, add them in your DNS provider's control panel.
- Wait 10–15 minutes, then ask:
Check if example.com is verified.
DNS changes usually take up to 30 minutes, in rare cases up to 48 hours.
- When the verification record and DKIM pass, send from any address on your domain, for example
[email protected].
On the Free plan, you can send from your domain only to addresses on your own domain or to confirmed addresses. To email your customers, choose a paid plan.
Without MCP, add and verify the domain in Settings → Sending domains or follow Getting started.
Example prompts
- "Add my teammate's address to the sandbox recipients."
- "Why isn't my domain verified yet? Tell me what to fix."
- "Create an order confirmation template with the customer's name, order number and total."
- "Notify https://example.com/hooks/unione when an email bounces or gets a spam complaint."
- "Why doesn't [email protected] get our emails?"
- "Check these five addresses before I send to them."
- "Export last week's delivery events to a CSV file."
Tools
Each tool has a type. Clients use it to ask for your confirmation before an action that sends email, changes or deletes something.
- Read — only reads data.
- Write — creates or changes data; nothing is lost.
- Destructive — sends email, overwrites or deletes. Your client asks you to confirm.
| Area | Tool | Type | What it does |
|---|---|---|---|
| Account | get_account | Read | Shows the account or project you're connected to |
| Domains | list_domains | Read | Lists your domains and their verification status |
get_dns_records | Write | Adds a domain if needed and returns the DNS records to set | |
validate_domain | Read | Checks the verification record and DKIM | |
delete_domain | Destructive | Deletes a domain; sending from it stops | |
| Sandbox | get_sandbox_domain | Write | Returns your sandbox domain, creating it if needed |
list_confirmed_emails | Read | Lists sandbox recipients and their status | |
add_confirmed_email | Write | Adds a sandbox recipient and sends a confirmation email | |
delete_confirmed_email | Destructive | Removes a sandbox recipient | |
| Sending | send_email | Destructive | Sends an email now or up to 24 hours later. Can't be undone |
| Templates | list_templates, get_template | Read | Lists templates or shows one |
set_template | Destructive | Creates a template or overwrites an existing one | |
delete_template | Destructive | Deletes a template | |
| Webhooks | list_webhooks, get_webhook | Read | Lists webhooks or shows one |
set_webhook | Destructive | Creates, overwrites or pauses a webhook | |
delete_webhook | Destructive | Deletes a webhook | |
| Suppression list | get_suppression, list_suppressions | Read | Shows why and since when an address is on the list |
set_suppression | Destructive | Adds an address to the list, so emails to it aren't sent | |
delete_suppression | Destructive | Removes an address from the list, if this is allowed | |
| Validation | validate_email | Write | Validates an address. Billed per check |
| Delivery logs | request_event_dump, get_event_dump | Write, Read | Exports delivery events to a file |
delete_event_dump | Destructive | Deletes an export | |
| Tags | list_tags | Read | Lists tags |
delete_tag | Destructive | Deletes a tag | |
| Projects | list_projects | Read | Lists projects |
create_project | Write | Creates a project and returns its API key | |
update_project | Destructive | Overwrites project settings | |
delete_project | Destructive | Moves a project to the trash |
Project tools work when projects are enabled for your account.
Security
- You confirm risky actions. Tools that send email, overwrite or delete are marked destructive, so your client asks you to confirm first.
- No secrets in logs. Keys and tokens are passed to the UniOne API and never written to our logs.
- Allow only what you started. The application name on the consent screen is set by the application itself. Allow access only if you started the connection yourself.
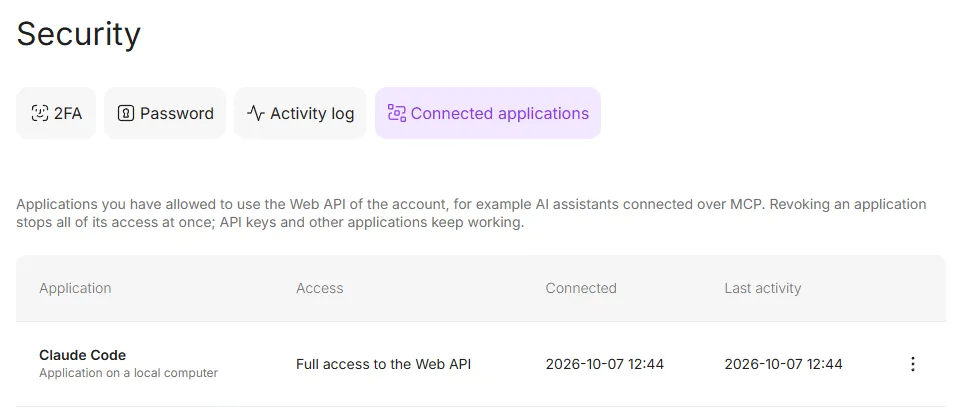
- Revoke at any time. Open Settings → Security → Connected applications and revoke the application from the menu next to it. Its access stops at once; other applications and your API keys keep working. For API key connections, regenerate the key.
- Same rules as the API. Every tool calls the public Web API, with the same limits, billing and permissions.
- Keys stay on the server. Use MCP to set things up and check them. In your application, call the Web API from your server with the key in an environment variable. The setup prompt on UniOne for AI agents gives your agent these rules.
Troubleshooting
Tools return Web API responses as they are. A successful call returns 200. An error returns a 4xx or 5xx HTTP code with an error code and a message that says what went wrong. See all error codes in API errors or in the OpenAPI spec.
| Response | What it means | What to do |
|---|---|---|
401 | The key or sign-in is missing, or access was revoked | Check the Authorization: Bearer header, update the key or sign in again |
Other 4xx | Something is wrong with the request | Read the error message: it names the field or the limit. Ask the agent to fix the request |
429 | Too many calls in a short time | Wait and retry |
5xx | Temporary problem on our side | Retry later. If it keeps happening, contact support |
If the consent screen asks you to contact the account owner, your role doesn't include Connected applications. Ask the owner to add it, or to connect the client.
Related
- UniOne for AI agents — setup prompt for coding agents
- Send email with MCP — what your agent can do with the UniOne MCP server
- Web API reference
- llms.txt · OpenAPI JSON