
Setting up the domain DNS records
- Why Email Authentication Is Important: SPF, DKIM, and DMARC
- How to add a domain and get the required DNS records in UniOne
- Entering DNS records using Godaddy.com hosting as an example
Why Email Authentication Is Important: SPF, DKIM, and DMARC
Email authentication is an important security mechanism for your domain. It helps email services distinguish legitimate emails from spam and phishing attacks. This significantly reduces the likelihood that your emails will end up in the spam folder, increasing your inbox delivery rate. In UniOne, setting up DNS records for email authentication of the sender’s domain is mandatory for getting started.
SPF is a protocol that determines which servers are authorized to send emails on behalf of your domain. When an email is sent, the recipient's mail server checks whether the IP address of the sending server matches the list specified in the SPF record for your domain. If the IP address does not match, the email may be marked as spam or even rejected.
DKIM is an authentication method that uses a cryptographic signature to confirm the authenticity of the email being sent. When you send an email, it is automatically signed with your domain's private key. The recipient's mail server verifies this signature with the public key stored in your domain's DNS. If the signature matches, the email is considered authentic.
DMARC is a policy that allows the domain owner to define how emails that fail SPF and DKIM checks should be handled. It also provides reports on how such emails are processed, which helps improve the domain's protection against unauthorized use.
How to add a domain and get the required DNS records in UniOne
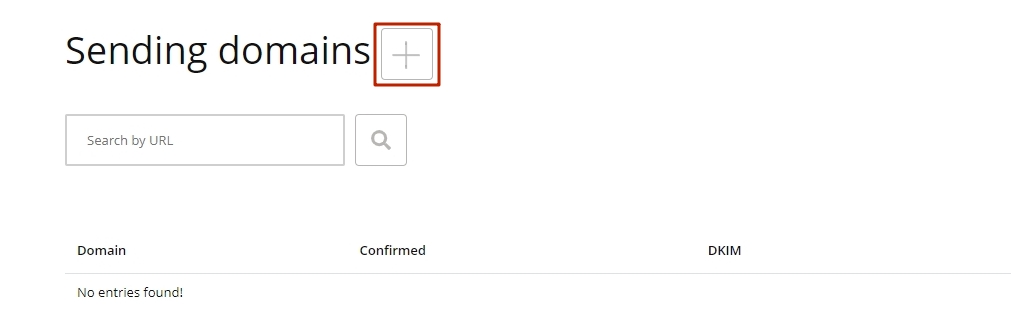
Go to the Settings – Sending domains page and add a new domain by clicking the plus button next to the page title.
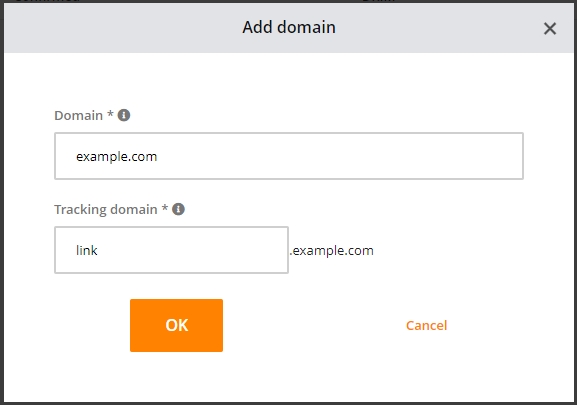
A window will open where you enter your sending domain name, and also a third-level domain that will be used to track email reads and clicks on links (for the domain example.com, you can specify send.example.com or link.example.com). Click Save.
After adding a domain, you’ll see several DNS records that you will need to register in the DNS zone of your domain. If necessary, you can view these records anytime by clicking on the settings icon alongside the necessary domain in the list.
Entering DNS records using Godaddy.com hosting as an example
We will be adding records using godaddy.com hosting service as an example. Yours will probably be different, but the interface will look very similar. For each DNS record you are creating or altering, you’ll need to specify its name, record type and value, as described below.
SPF record
Before adding an SPF record, check if you have previously added a v=spf1 record for this domain. If so, you need to combine it with the new one by including all the servers in one line. For example, if you already have a value v=spf1 include:godaddy.com ~all, and now you’re adding spf.unione.io,.the resulting value will look like v=spf1 include:godaddy.com include:spf.unione.io ~all.
If there is no existing v=spf1 record, just add a new line for the domain @ TXT v=spf1 include:spf.unione.io ~all, where:
- @ is the record name. Note that some providers do not support @ and instead of this abbreviation you’ll need to specify your full domain name.
- TXT is the record type.
- v=spf1 include:spf.unione.io ~all is the record value.

DKIM record
To configure DKIM, in the name field, specify us._domainkey, and in the data field insert the long string obtained earlier (it looks like v=DKIM1; k=rsa; p=xxxxxxxxxxxxxxxxxxxxxxxxxxx). The record type is TXT, as in the previous one.

verification-record
To make sure that the domain belongs to you and you are allowed to send emails from any address on this domain, you need to add the verification record. It is a record with the TXT type and the @ name.

DMARC record
DMARC will protect your addressees from unauthorized emails pretending to come from your domain for which SPF and DKIM checks do not match.
Example of a DMARC record value: v=DMARC1; p=quarantine; rua=mailto:[email protected]., where p prescribes the action to be taken:
- p=none — do not take action (this may be used temporarily when you reconfigure your system),
- p=quarantine — mark an offending email as spam,
- p=reject — reject an email.
If you already have a DMARC record for your domain, you can leave it as is. If you do not have one, create a new record as shown below, with CNAME for type, _dmarc for name and example.com.dmarc.unione.io. for value, thereby delegating DMARC management to us.

NS record
And the last records, with the NS type, are necessary for setting up the link tracking domain. For more information on link tracking, see our article.

Some hostings may not allow you to enter records with the NS type, in which case you’ll need to contact your hosting’s tech support.
After adding all the records, it will take some time for the DNS zone to update. Usually it takes from 30 minutes to several hours. By clicking Check on your UniOne account’s Sending domains page in the corresponding domain line, you will see the current status of the domain setup. Green check marks will appear when the process is completed.

Happy mailing!
